The User Sentiment widget can be used to gather video feedback by letting viewers rate their experience. During video playback, a rating widget will appear over the video. Different display options are available:
- Thumbs Up/Thumbs Down

- Star Rating (out of 5)

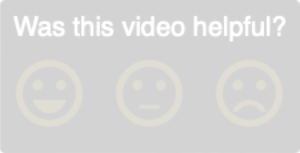
- Emoticons
The text above the rating can be easily changed and the widget can be positioned anywhere on the player (default is upper right corner). When the icon is clicked, it stays in the clicked/selected state for the remainder of the video. A User Sentiment report is available to provide the aggregate feedback about the ratings.
User like counts
When using the Thumbs Up/Down icon type, you can optionally display the count for the number of likes and dislikes.
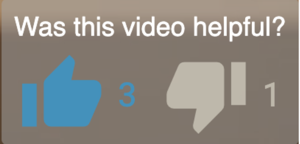
The two counts can be activated separately from the configure modal. A threshold can be set for each count which will prevent the count from displaying until a certain number of likes/dislikes have been recorded.
The like and dislike counts do not have to be displayed. Brightcove Interactivity will still continue to collect the data in case you decide to display them at a later date.
Adding a user sentiment widget
Typically, the User Sentiment widget is added to a template so that it can be easily added to multiple videos easily. Follow these steps to add a user sentiment widget to a template:
- Login to Brightcove Interactivity Studio.
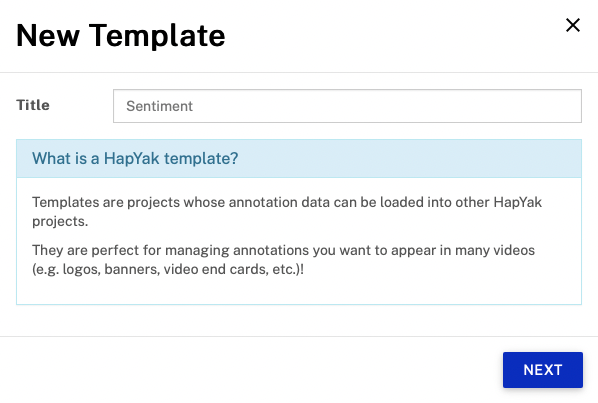
- Click NEW TEMPLATE.
- Enter a Title and click NEXT.
- Confirm that the template is created. A sample video is automatically loaded into the template. To change the video, click Configure and enter a new Video Source.
- Click the widget icon in the bottom toolbar.

- Click the User Sentiment widget.
- Click ADD. The widget is added on top of a sample video.
- Hover over the widget and click CONFIGURE.
- Enter a USER PROMPT. This is the text that will appear at the top of the widget.
- Select a TYPE of widget.
- Choose to display the COUNT SETTINGS (displayed only for Thumbs type). A threshold can be set for each count which will prevent the count from displaying until a certain number of likes/dislikes have been recorded.
- Set the icon, font and color settings as needed.
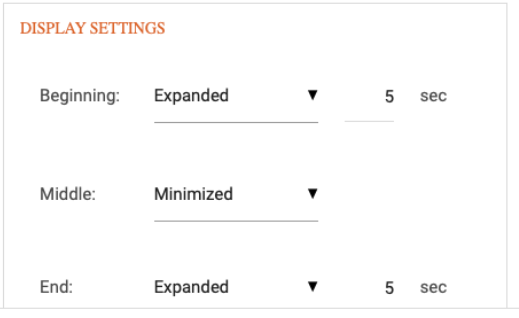
- The DISPLAY SETTINGS control how the widget appears during video playback.
- Beginning - Controls how the widget will appear when the video starts playing
- Middle - Controls how the widget will appear as the video is playing
- End - Controls how the widget will appear at the end of the video
The following example would display the sentiment widget for 5 seconds when the video starts playing, then it would minimize and then expand for the last 5 seconds of the video.
- Click SAVE.
A tag can be added to templates as a way to quickly add the User Sentiment widget to Video Cloud videos that are published using a HapYak-enabled player. If a published video has the same tag that was assigned to the template, the User Sentiment widget will be displayed during video playback.
Follow these steps to add a tag to the template.
- At the top of the page, click Configure.
- Locate the Tags field and click it.
- Add one or more Tags.
This example is using a tag of
sentiment.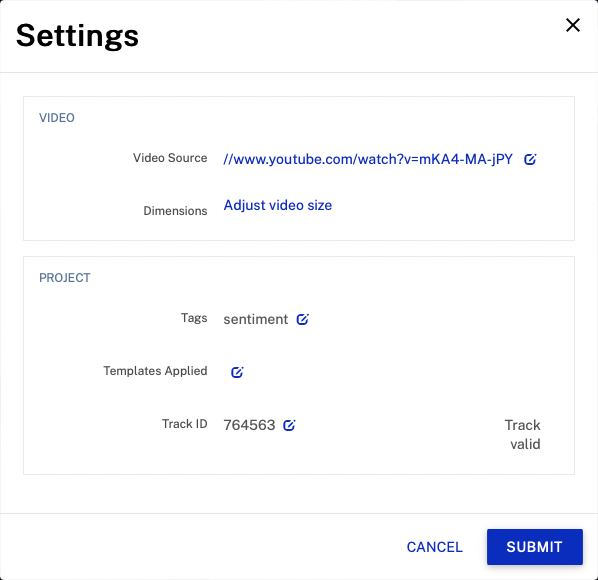
- Click SAVE and then SUBMIT.
By adding the tag sentiment to the template, any Video Cloud video that is tagged sentiment and published using a HapYak-enabled player will have the User Sentiment widget displayed during video playback.
Reviewing sentiment reports
The User Sentiment widget will collect a "rating" when the viewer clicks on their satisfaction emoji. Since there are three types of emojis which have been implemented (thumbs, stars and a smilies), each has its own rating map which is then normalized into a score from 1-5.
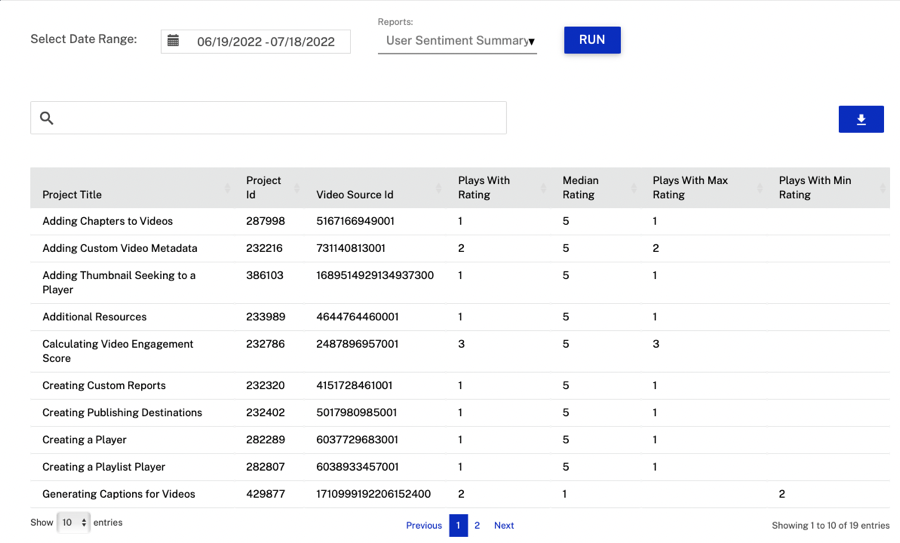
The User Sentiment Summary report provides information on all projects with the User Sentiment widget. To access the report, follow these steps:
- Login to Brightcove Interactivity Studio.
- In the left navigation, click Core Reports.
- Select a Date Range for the report.
- At the top of the page use the report selector to select the User Sentiment Summary report.
- Click .
The report will display all projects with the User Sentiment widget.