
Configuring Adobe Analytics Event Tracking
The Players module provides the ability to easily integrate Brightcove Players with Adobe Analytics. This allows event tracking data to be sent to an Adobe Analytics account for reporting purposes.
The Players module supports two implementations of the Adobe Analytics integration:
- AppMeasurement (legacy) - the original integration, which sends data using Adobe's
AppMeasurement.jsandVisitorAPI.jslibraries. - Web SDK - the newer integration, which sends data to the Adobe Experience Platform Edge Network using the Adobe Experience Platform Web SDK (
alloy.js). Report suite routing is handled server-side in an Adobe datastream, so the legacy connection fields are no longer entered in the Players module. The Web SDK implementation requires Brightcove Player 7.44.0 or later.
To configure the integration, the following tasks need to be performed:
- Choose an implementation (AppMeasurement or Web SDK)
- Review the available events to track
- Create Custom Success Events in Adobe Analytics
- Review the available parameters to capture
- Create Traffic Variables in Adobe Analytics
- Set up an Adobe datastream (Web SDK only)
- Enable the integration in the Players module
- Configure the page to collect data
Note that when the integration is configured, only analytics for video events will be passed to Adobe Analytics.
Choosing an implementation
Both implementations track the same Brightcove player events and parameters. Only the way data is transported to Adobe differs. Use the table below to decide which one to configure.
| AppMeasurement (legacy) | Web SDK | |
|---|---|---|
| Transport | Adobe AppMeasurement.js + VisitorAPI.js loaded on the page |
Adobe Experience Platform Web SDK (alloy.js), sending to the Adobe Edge Network |
| Where routing is configured | In the Players module: Report Suite ID, Marketing Cloud Organization ID, Tracking Server, etc. | Server-side in an Adobe datastream; in the Players module you enter only the Datastream ID and Organization ID |
| Minimum player version | Any supported version | Brightcove Player 7.44.0 or later |
| Recommended for | Existing integrations already collecting data through AppMeasurement | New integrations and customers moving to Adobe Experience Platform |
Reviewing the available events to track
Every Brightcove event that will be tracked must be created as a Custom Success Event in Adobe Analytics. The event IDs from Adobe will then be used inside the Players module. This allows Brightcove event data to be passed to Adobe Success events. Review the list of events below to determine which events you want to track.
- Player Load (bcvideo_player_load) - Sent when a player has been loaded and is ready for playback
- Video Impression (bcvideo_video_impression) - Sent when a video has been loaded into a player and is ready for playback
- Video View (bcvideo_video_view) - Sent when a video has started playing back either through auto-play or due to user interaction
- Video Engagement (bcvideo_video_engagement) - A user watched a range of seconds of a video's timeline. This event is a heartbeat for tracking video engagement and will likely be sent many times during playback, depending on the user interaction and the length of the video.
- Play Request (bcvideo_play_request) - Sent when playback is initiated either by the user expressly clicking the play button, or automatically when the platform triggers playback in an auto-play scenario
- Ad Start (bcvideo_ad_start) - Sent when control is handed over to an advertising agent by the playback platform
- Ad End (bcvideo_ad_end) - Sent when control is handed back from the advertising agent to the playback platform
- Error (bcvideo_error)- Sent when fatal errors which disrupt the playback experience are encountered
Adding Custom Success Events to Adobe Analytics
After you determine which events you want to track, Custom Success Events must be created in Adobe Analytics. To create Custom Success Events in Adobe Analytics, follow these steps.
- Login to your Adobe Analytics account.
- Select a Report Suite to work with or create a new one (Admin > Report Suites).
- Click Edit Settings > Conversion > Success Events.
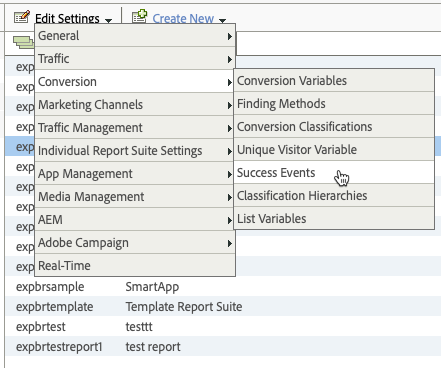
- Click Add New.
- Enter the event information:
- Name - You must use the bcvideo- name listed in the previous section
- Type - Set to Counter
- Description - Add a meaningful description
- Create a new success event for each event you want to track. Click Save to save the events.
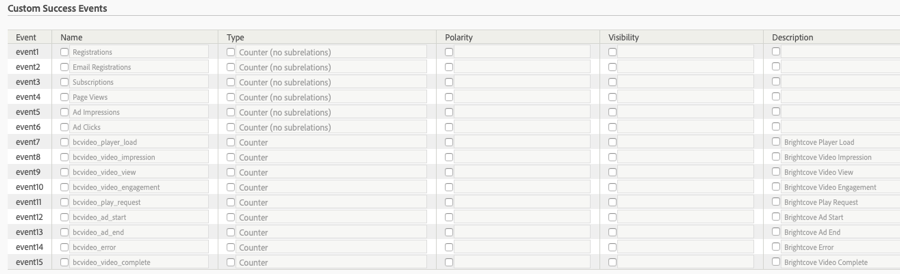
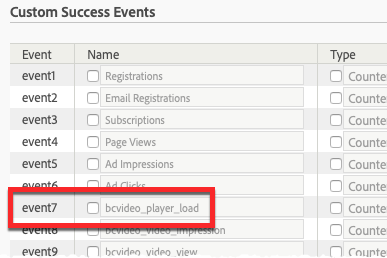
The image below shows Custom Success Events created (event7 - event15) for each of the Brightcove events.
Reviewing the available parameters to capture
Parameters carry additional data and are passed with events. Every Brightcove parameter that will be recorded must be created as a Traffic Variable in Adobe Analytics. The parameter named will then be used inside the Players module. This allows Brightcove parameters to be passed to Adobe Traffic Variables. Review the list of parameters below to determine which ones you want to capture.
- Account ID (bcvideo_account) - Brightcove account name
- Player ID (bcvideo_player) - Player ID
- Player Name (bcvideo_player_name) - Player Name
- Player Version (bcvideo_platform_version) - Player version number
- Session (bcvideo_session) - Session identifier
- Video ID (bcvideo_video) - Video ID of the video
- Video Name (bcvideo_video_name) - Name of the video
- Range (bcvideo_range) - The range of seconds viewed in the format StartSecond..EndSecond
- Video Seconds Viewed (bcvideo_video_seconds_viewed) - Count of watched seconds
- Video Duration (bcvideo_video_duration) - The duration of the video in seconds
- Video Percent Viewed (bcvideo_video_percent_viewed) - Percentage of video watched
- Error Code (bcvideo_error_code) - Platform specific error code associated with the event
Creating Traffic Variables in Adobe Analytics
After you determine which parameters you want to track, Traffic Variables must be created in Adobe Analytics. To create Traffic Variables in Adobe Analytics, follow these steps.
- Login to your Adobe Analytics account.
- Select a Report Suite to work with or create a new one (Admin > Report Suites).
- Click Edit Settings > Traffic > Traffic Variables.
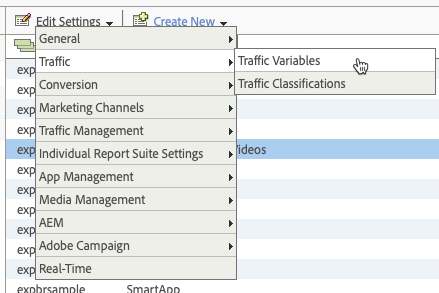
- Enter the parameter information:
- Name - You must use the bcvideo- name listed in the previous section
- Description - Add a meaningful description
- Create a new traffic variable for each parameter you want to track. Click Save to save the variables.
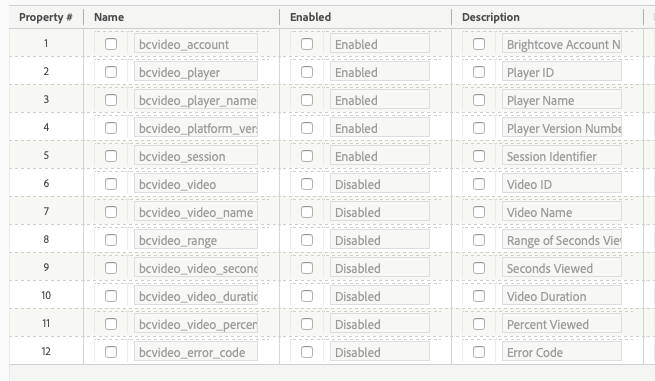
The image below shows Traffic Variables created for each of the Brightcove parameters.
Setting up an Adobe datastream (Web SDK only)
With the Web SDK implementation, report suite routing is handled server-side by an Adobe datastream instead of by connection settings in the Players module. Before data will flow to Adobe Analytics, an Adobe administrator must create a datastream and connect it to your report suite. You will then enter the datastream's identifiers in the Players module in the next step.
The following steps summarize the datastream setup. For detailed instructions, see Adobe's Create and configure datastreams documentation.
- Login to your Adobe Experience Platform account and open the Data Collection UI.
- Click Datastreams and create a datastream (a separate datastream is recommended for each environment, such as development, staging, and production).
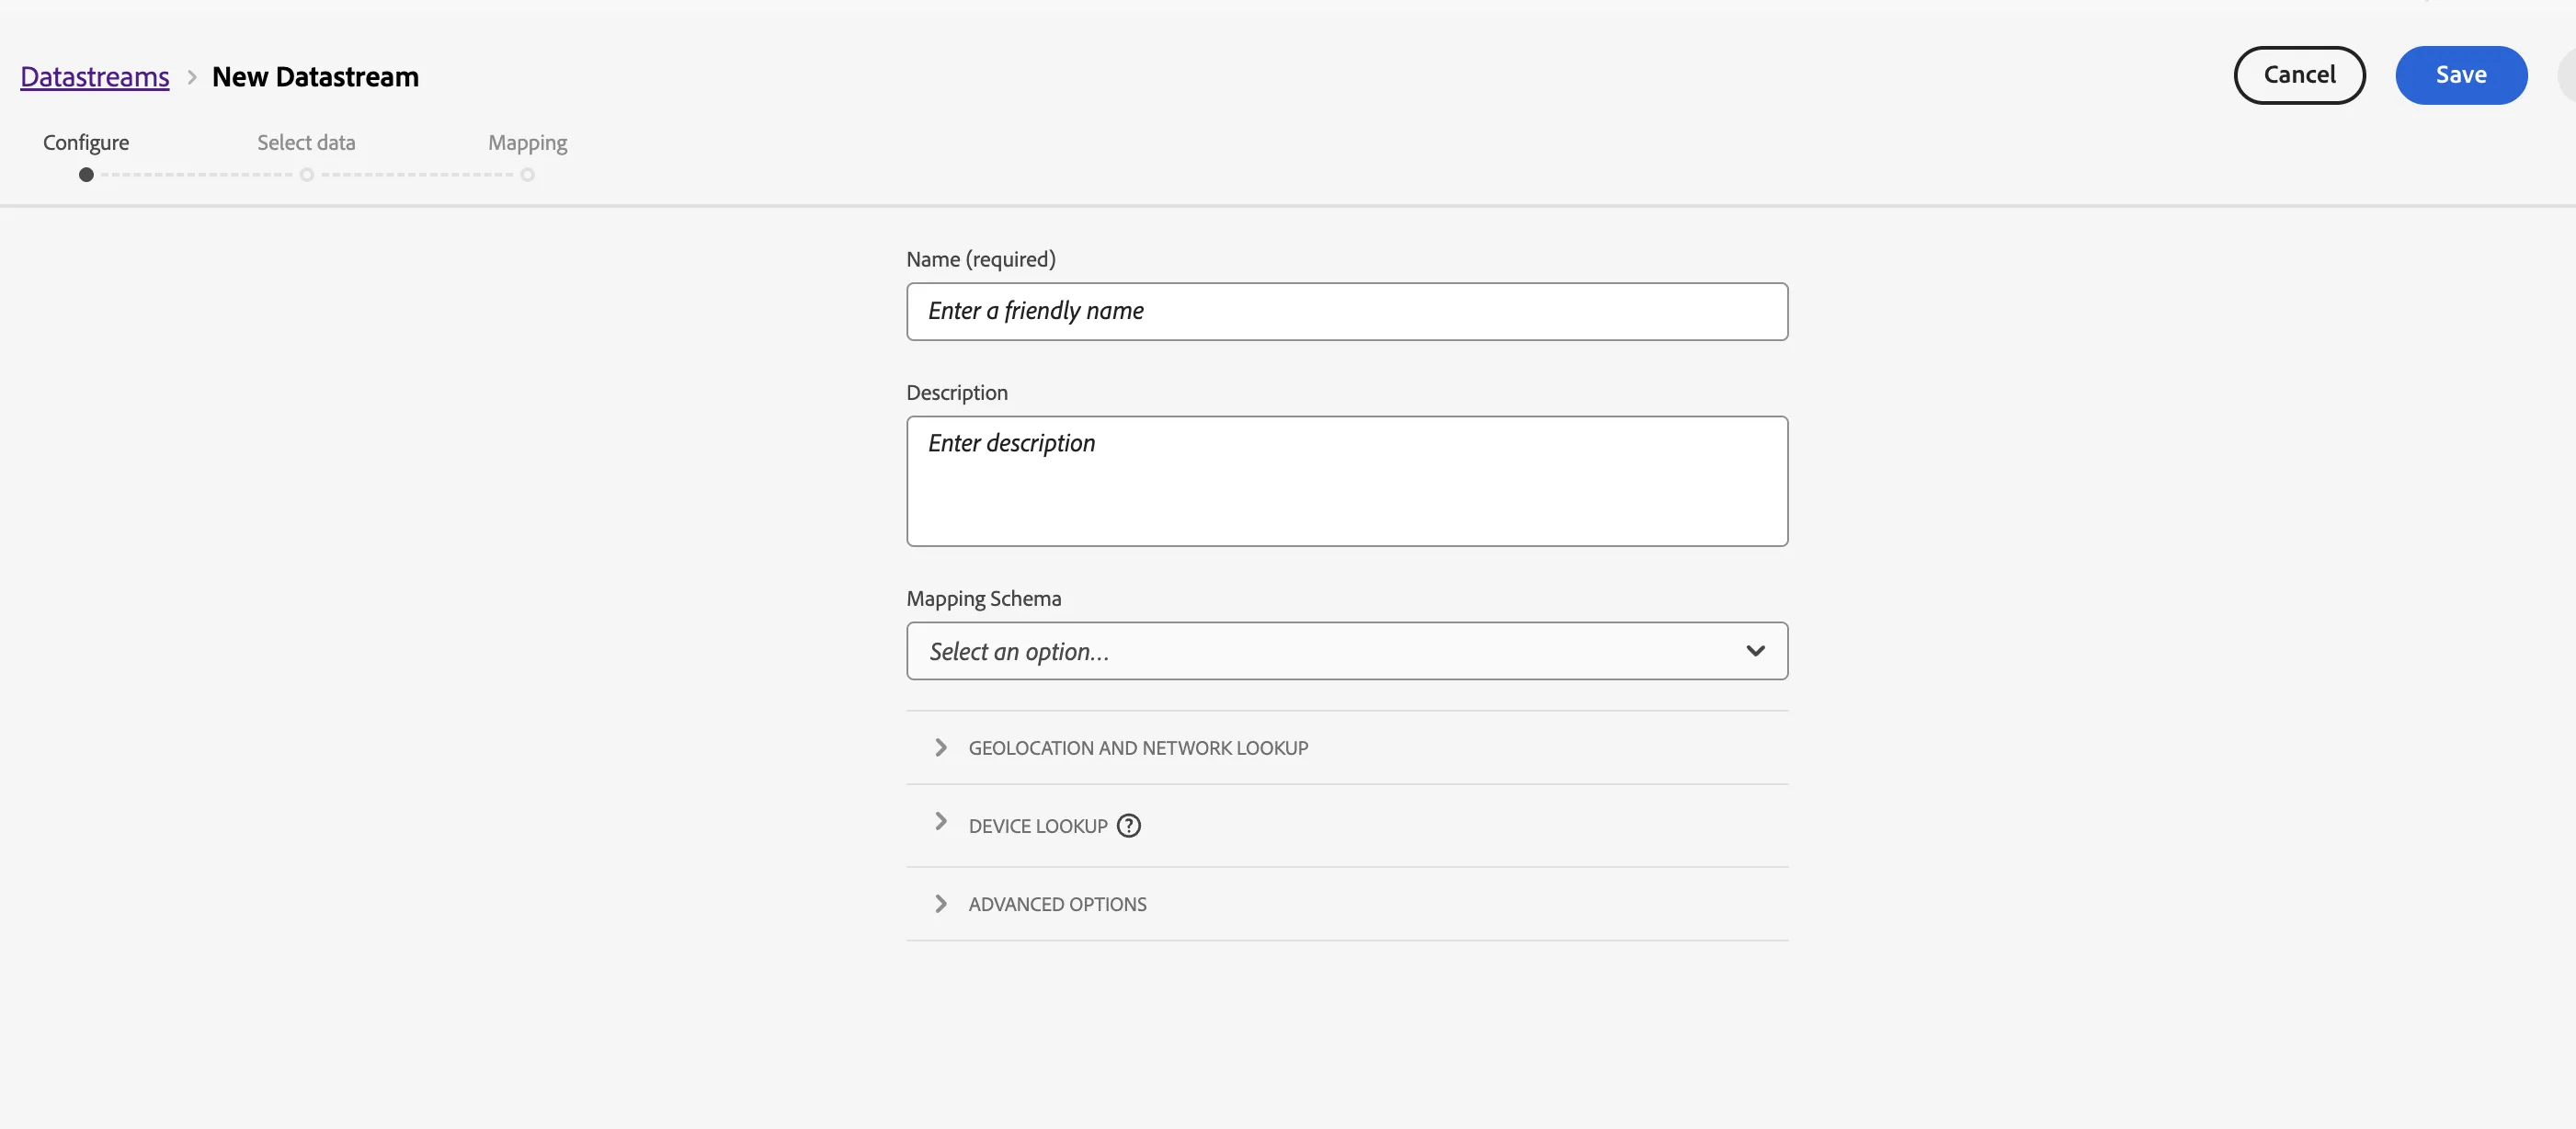
- Connect your report suite to the datastream. On the datastream's details page, click Add Service, select Adobe Analytics, and enter the Report Suite ID of the report suite where you created your Success Events and Traffic Variables. Click Save.
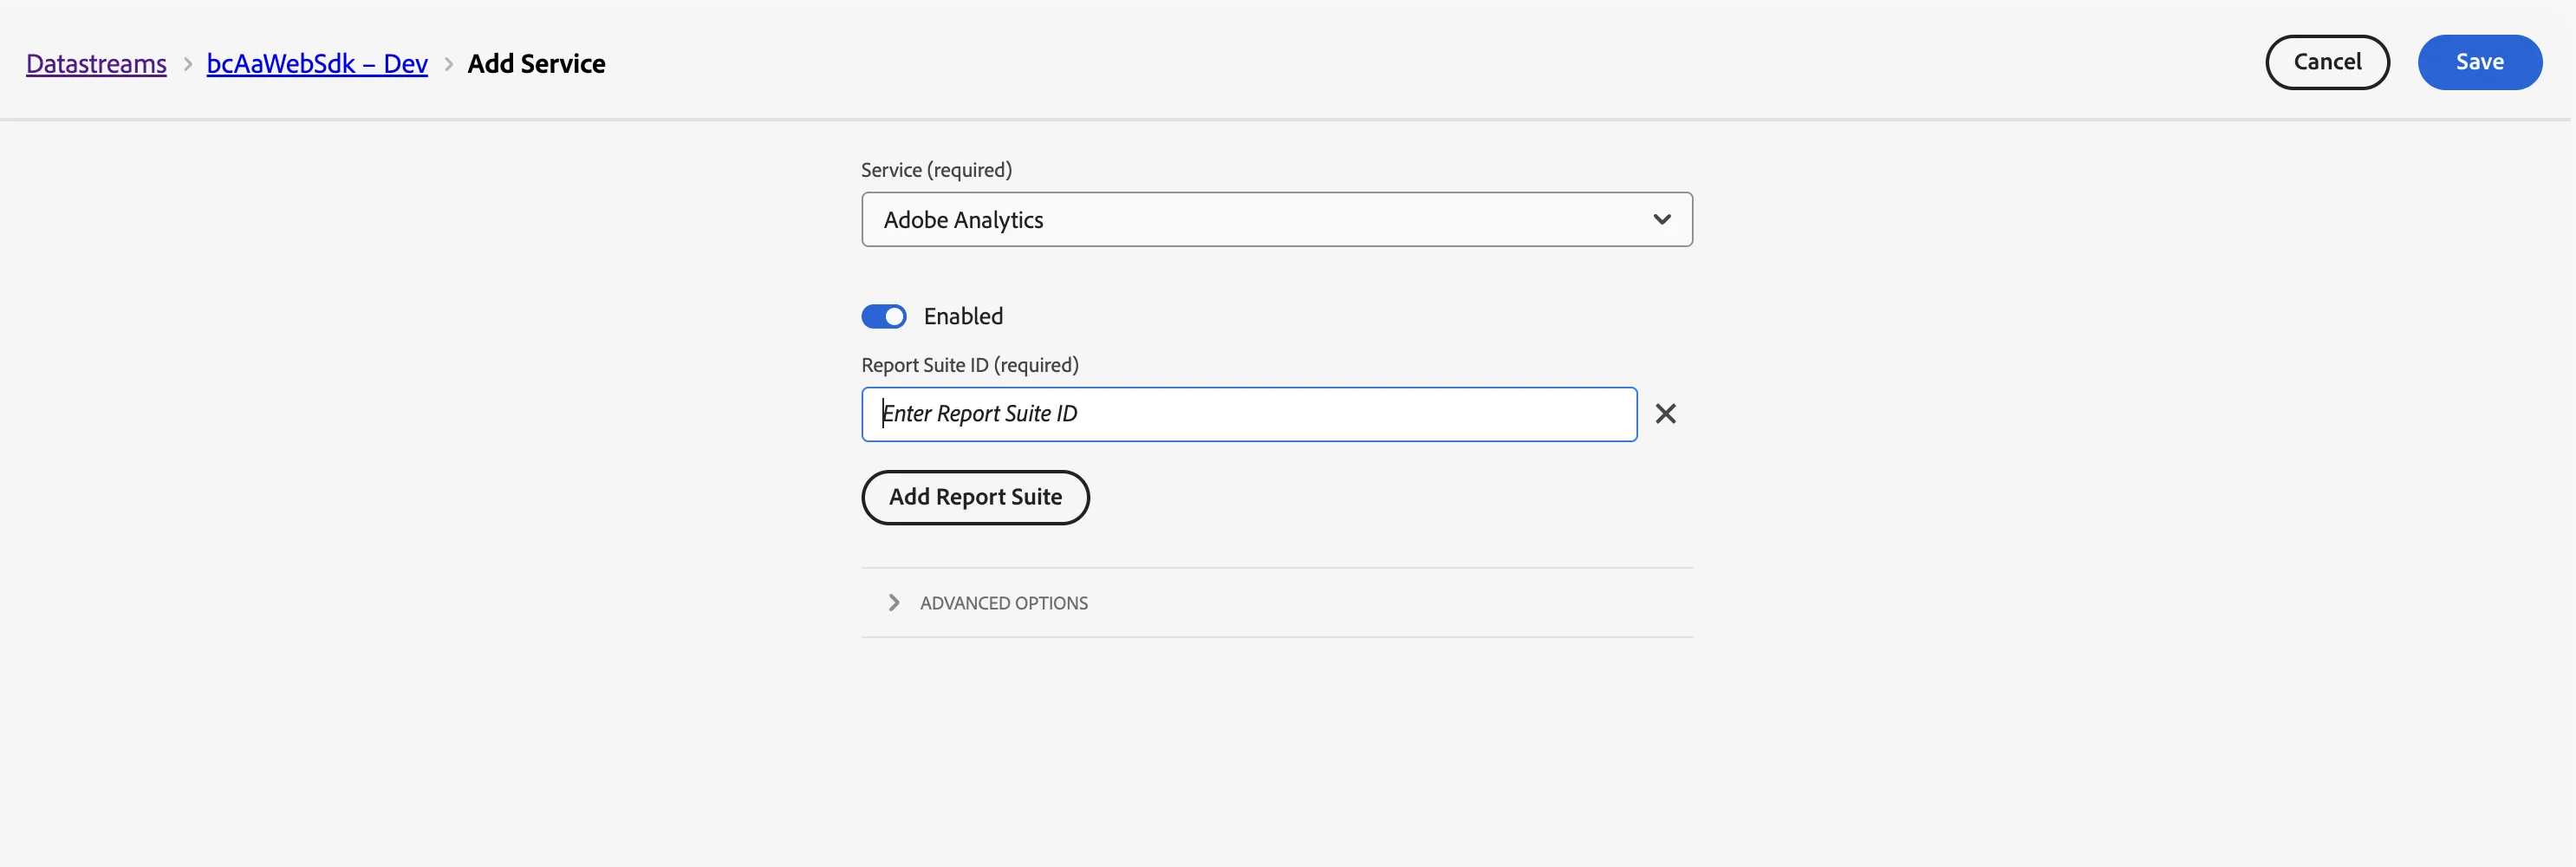
- Note the datastream's Datastream ID and your Organization ID (your Experience Cloud Organization ID, which ends in
@AdobeOrg). You will enter these values in the Players module in the next step.
Enabling the integration
You may want to log in to your Adobe Analytics account to copy needed information from there to the Players module. To configure Adobe Analytics event tracking for a player, follow these steps:
- Click the Players module.
- Click the link for the player you want to configure.
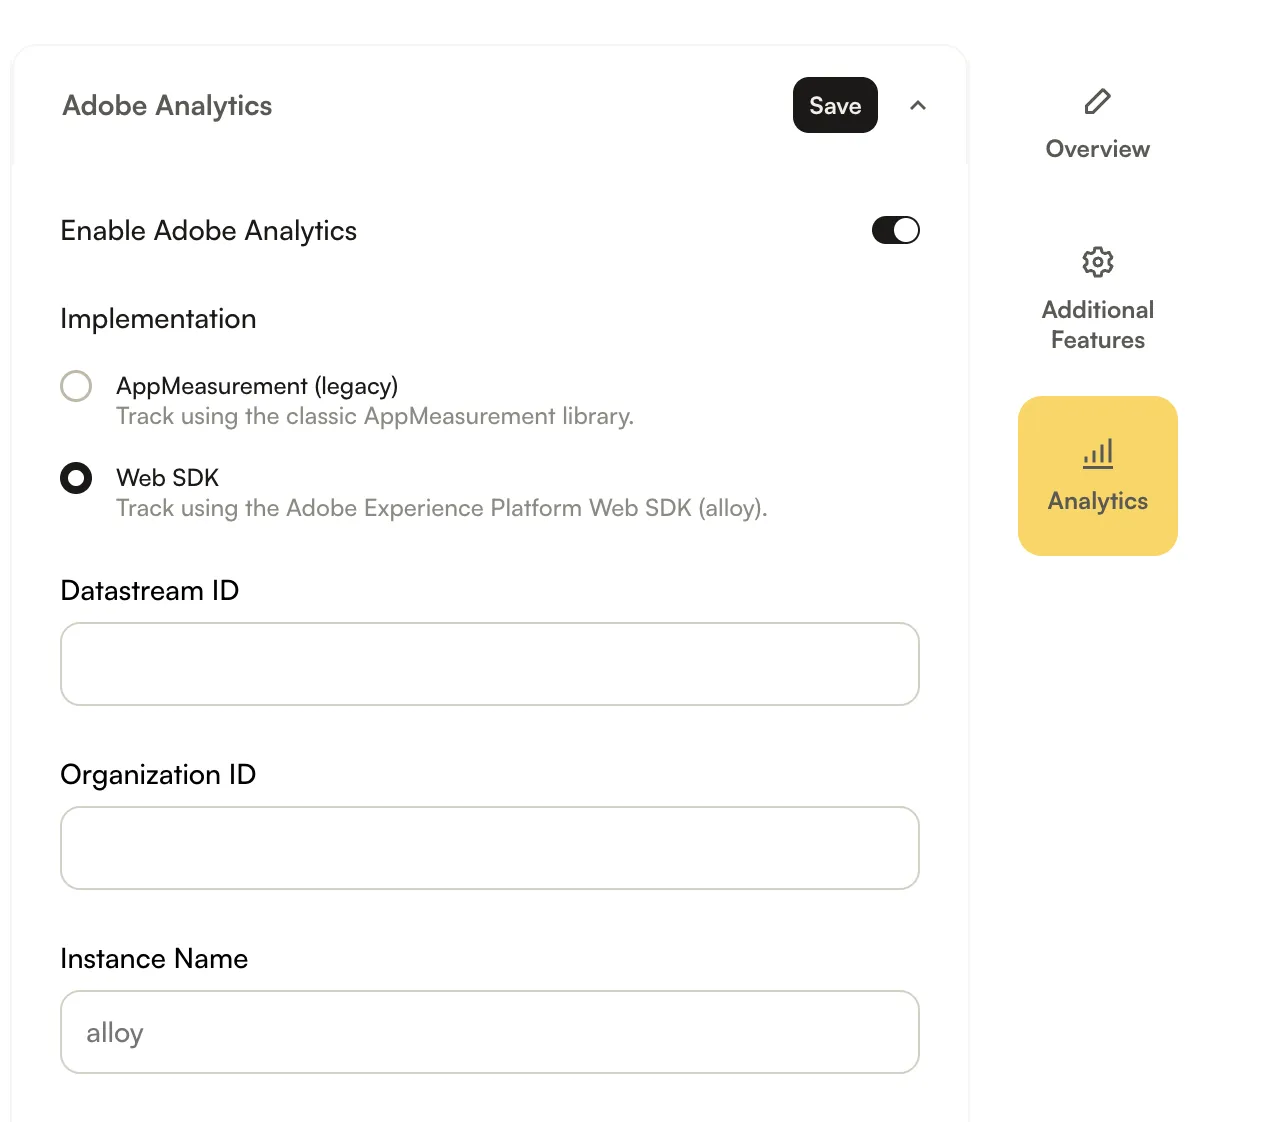
- Expand the Adobe Analytics section on the Analytics tab.
- Check Enable Adobe Analytics.
- For Implementation, select the integration you want to use:
- AppMeasurement (legacy) - the classic AppMeasurement integration.
- Web SDK - the Adobe Experience Platform Web SDK integration (requires Brightcove Player 7.44.0 or later).
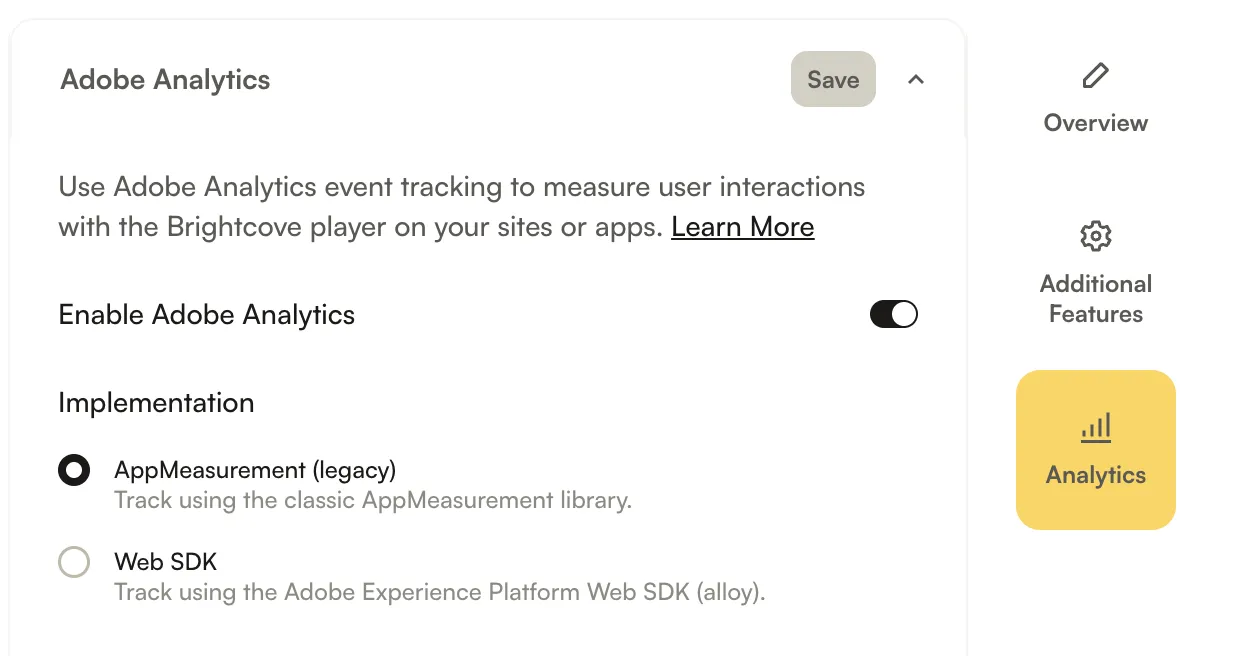
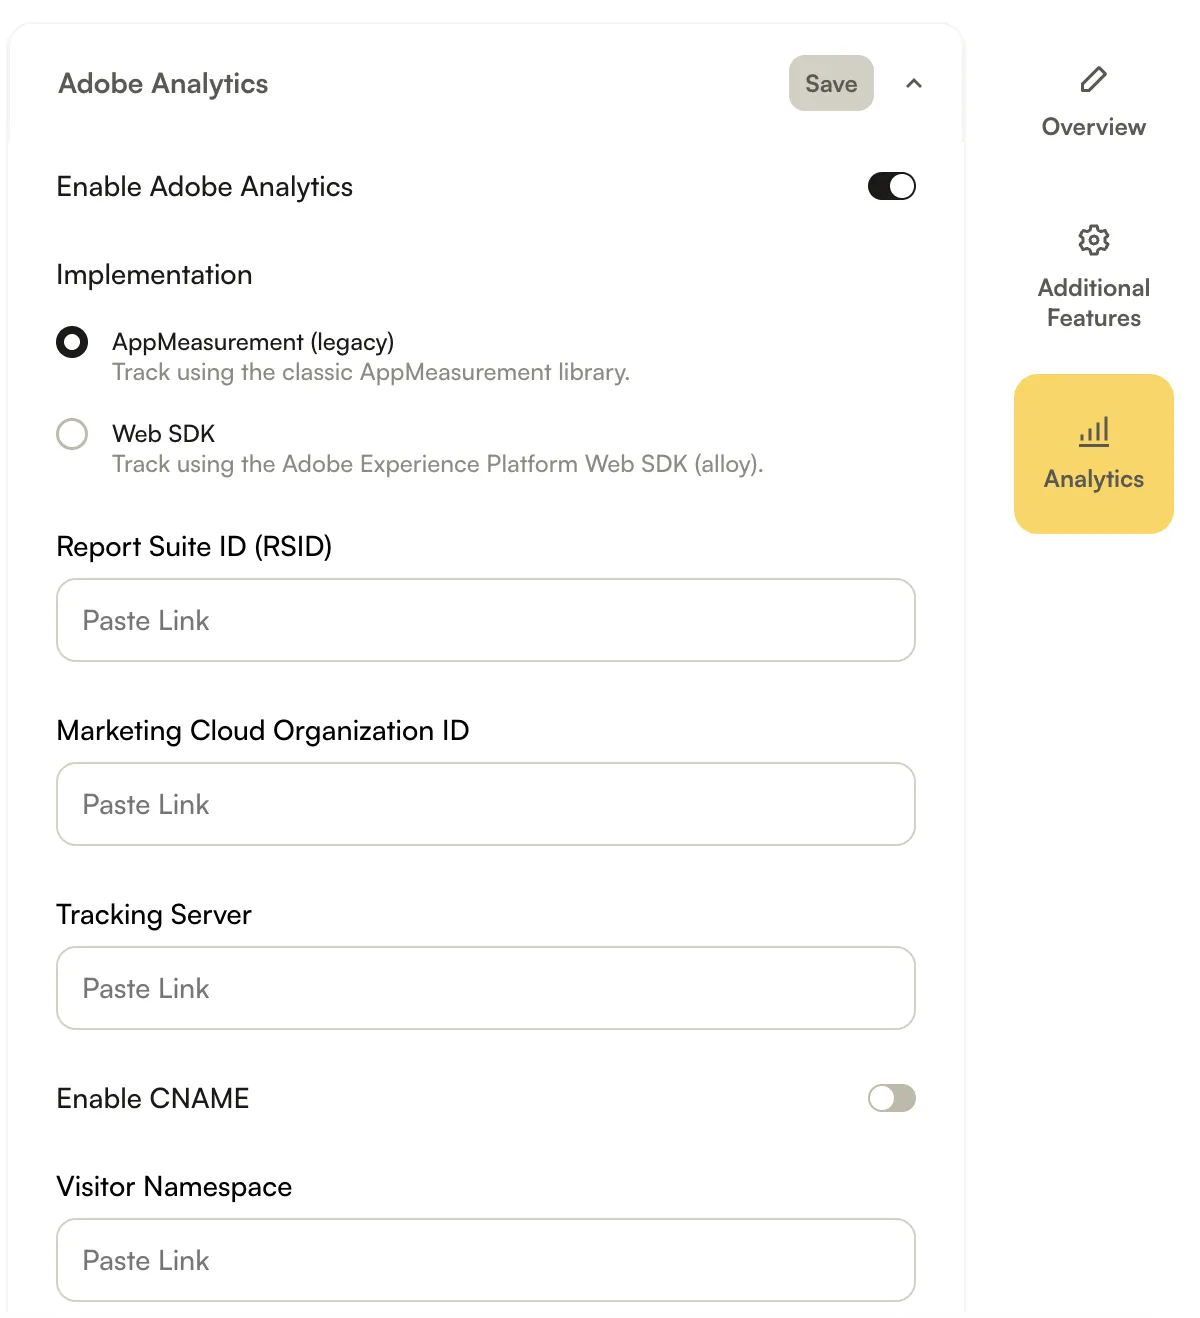
- Enter your Adobe connection information for the implementation you selected.
For AppMeasurement (legacy):
- Report Suite ID
- Marketing Cloud Org ID
- Tracking Server
- CNAME Enabled
- Visitor Namespace
For Web SDK:
- Datastream ID - the Datastream ID from your Adobe datastream (see Setting up an Adobe datastream).
- Organization ID - your Experience Cloud Organization ID (ends in
@AdobeOrg). - Instance Name - (optional) the global name of the
alloyinstance loaded on your page. Leave blank to use the default,alloy. Only change this if you load Adobe's Web SDK under a custom instance name.
- For each event you want to track, enter the event ID from Adobe Analytics into the corresponding field for the Brightcove event. In this example, when the bcvideo_player_load event was created as a Custom Success Event in Adobe Analytics, the event ID assigned was event7.
This is the value that should be entered into the field for the Player Load (bcvideo_player_load) event in the Players module.
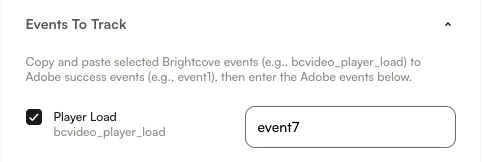
- Enter all of the event IDs from Adobe Analytics into the Players module as needed.
- Click Save to save the event mappings.
- For each parameter you want to capture, enter the parameter number from Adobe Analytics into the corresponding field for the Brightcove parameter using the format propX where X corresponds to the Property # in Adobe Analytics. In this example, a bcvideo-account Traffic Variable was created in Adobe Analytics to hold the Brightcove account ID. It was assigned to Property # 1.
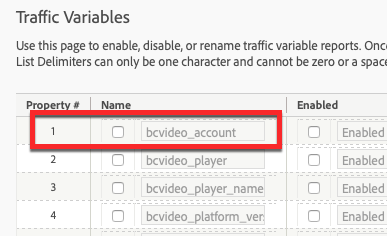
Therefore, prop1 should also be entered into the corresponding field for the parameter in the Players module.
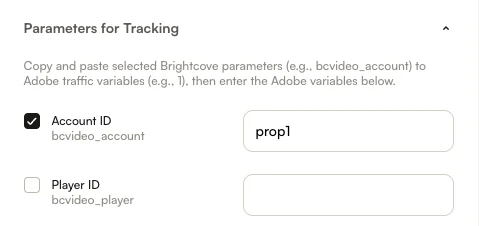
- Enter all of the parameter names from Adobe Analytics into the Players module as needed.
- Click Save to save the parameter mappings.
Make sure to publish the changes to the player.
Using the integration with a Gallery In-Page experience
If the player will be used in a Gallery In-Page experience, some configuration of the In-Page experience is required:
- Open the Gallery module.
- Edit the experience using the player with Adobe Analytics integration.
- Click SETTINGS > Advanced in the left navigation.
- Add the following to the JavaScript Code section, depending on the implementation you selected. This makes the Adobe library loaded on the top-level page available to the player inside the In-Page experience.
For AppMeasurement (legacy):
window.s_gi = window.top.s_gi
For Web SDK:
window.alloy = window.top.alloy
- Click Save.
Remember to republish the experience.
Configuring a page to collect data
To begin sending data to Adobe Analytics, data must be sent to a report suite to display in reporting. To successfully implement a page with code to collect data, you must have access to your hosting servers to upload new content to your website. It is also useful to have an existing site to implement code.
The Adobe libraries your page needs depend on the implementation you selected in the Players module. Follow the steps for your implementation below.
AppMeasurement (legacy)
The following steps walk through a basic AppMeasurement implementation.
- Download AppMeasurement for JavaScript and the Visitor ID service. The download is available in Code Manager (Analytics > Admin > Code Manager). The download zip contains several files.
AppMeasurement.jsandVisitorAPI.jsare the relevant files when implementing Analytics. - Host
AppMeasurement.jsandVisitorAPI.js. These core JavaScript files must be hosted on a web server that is accessible to all pages on your site. You need the path to these files when adding them to your pages. - Reference
AppMeasurement.jsandVisitorAPI.json all site pages with a Brightcove Player by adding the following lines of code in the<head>or<body>tag on each page.VisitorAPI.jsmust be included beforeAppMeasurement.js. These lines need to be added to your web pages.<script language="JavaScript" type="text/javascript" src="https://Insert Domain and path to file here/VisitorAPI.js"></script> <script language="JavaScript" type="text/javascript" src="https://Insert Domain and path to file here/AppMeasurement.js"></script>
Web SDK
With the Web SDK implementation, your page loads the Adobe Experience Platform Web SDK (alloy.js) instead of AppMeasurement.js and VisitorAPI.js. The player uses the alloy instance that is present on the page; it does not load the Web SDK for you.
- Add Adobe's Web SDK base code snippet to the
<head>of each page with a Brightcove Player, before the Web SDK library and the player embed code. This snippet defines thealloycommand queue synchronously so that events are captured even while the library is still loading.<script> !function(n,o){o.forEach(function(o){n[o]||((n.__alloyNS=n.__alloyNS|| []).push(o),n[o]=function(){var u=arguments;return new Promise( function(i,l){n.setTimeout(function(){n[o].q.push([i,l,u])})})},n[o].q=[])})} (window,["alloy"]); </script> - Load the Adobe Experience Platform Web SDK (
alloy.js) on the page, after the base code snippet. You can load it from Adobe's CDN or host it on your own domain.<script src="https://cdn1.adoberesources.net/alloy/2.x/alloy.min.js" async></script>
- Publish your player using the Advanced (in-page) embed code on the same page. The plugin reads the Datastream ID and Organization ID you entered in the Players module and configures the
alloyinstance if the page has not already configured it.
Confirming the setup
To confirm that Brightcove event data is being captured in Adobe Analytics, follow these steps.
- Login to your Adobe Analytics account.
- Click Reports.
- Click Site Metrics > Real-Time.
- Confirm that the correct Report Suite is selected.
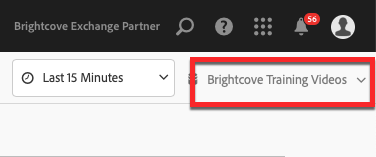
- Click Configure.
- Enter a Report Name.
- For the Metric, Primary Dimension and Secondary Dimension, select Brightcove events that you configured as Success Events in Adobe Analytics. The events should appear in the list.
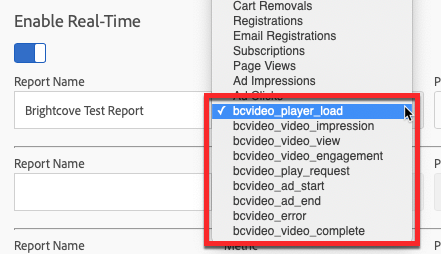
- Select other events to fill the dimensions.

- Click Save and View Report.
- Confirm that the expected data appears in the report.
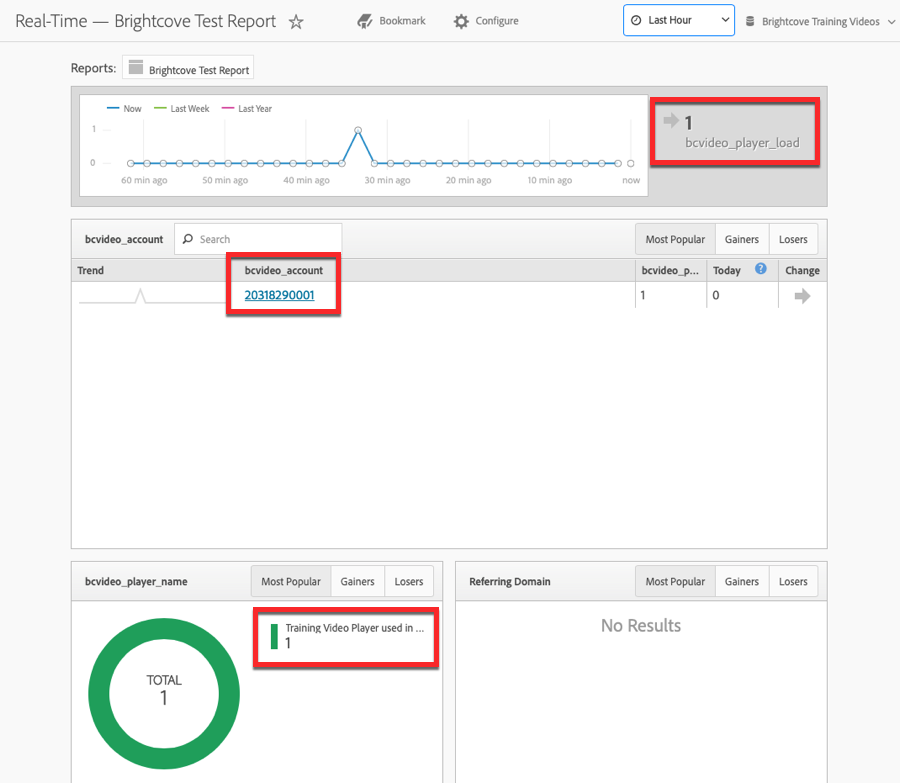
If data is not appearing:
- AppMeasurement (legacy): Verify that the URLs to the
AppMeasurement.jsandVisitorAPI.jsfiles are valid. Check the browser console to make sure no 404 errors are appearing. - Web SDK: Verify that the Web SDK (
alloy.js) and the base code snippet are loaded in the page<head>before the player embed, that the Instance Name in the Players module matches the instance loaded on the page, and that the Datastream ID points to a datastream connected to the correct report suite. Check the browser console for warnings from the plugin about a missingalloyinstance. - In both cases, ad blockers may prevent data from being sent to Adobe.