Introduction
With JavaScript plugin code, you can add free-form pages to your web app by using the Custom Pages element. To create and populate the page with content, you will:
- Create the page in Beacon Classic.
- Use an
ifstatement to check if the loaded page is your custom page. The condition of theifstatement uses the name (slug as it is referred to) of the page. - Populate and style the page as desired.
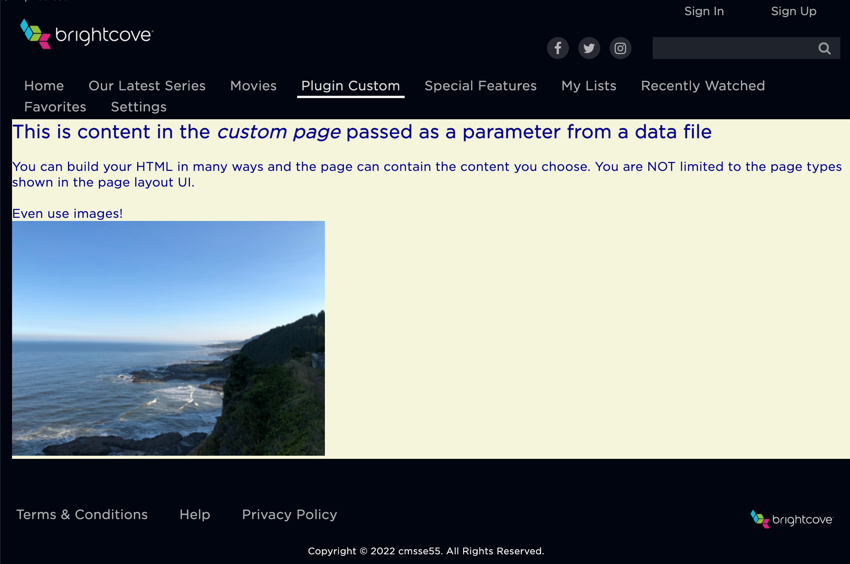
Here is a very simple custom page with the page name Plugin Custom with some textual content and one image. The font color and background color are set through the index.css file.
Use cases
The use cases for a custom page are numerous, but basically, anytime you want to have a page that is not one of the page types you can choose in the UI, you can use a custom page. For instance:
- A app centered around a conference uses a custom page to display the schedule of conference attendees.
Creating the custom page
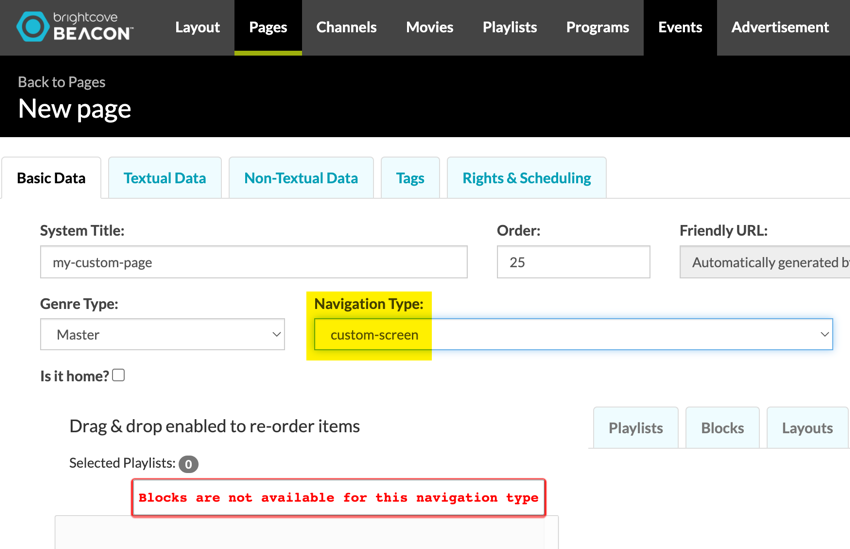
First, you must create the custom page in Beacon Classic.
- In Beacon Classic:
- In the top navigation click Pages.
- Click Add new page.

- Complete the Basic Data form. For the Navigation Type, you must choose custom-screen.
- Complete the rest of the information on the other tabs as you have done for other pages.
- After you save your page, be sure to record the slug of your created page. Slugs are highlighted in this screenshot:

Events
The key event action taken when using custom pages is listening for onBeaconPageLoad. The reason is that you want to listen for that event, then check to see if the page loaded is your custom page. If it is, populate the page with your content. The code below shows the implementation of that logic.
window.addEventListener("message", (event) => {
  const originsAllowed = [
    'https://beacon-web.ott.us-east-1.qa.deploys.brightcove.com'
  ];
  if (originsAllowed.includes(event.origin)) {
    if (event.data.event == 'onBeaconPageLoad') {
      if (event.data.data.slug == '24849-custom-for-plugin') {
        populateCustomPage(pageContent);
      }
    }
  }
},
  false
);
In this case, populateCustomPage() is a user defined function. This function is detailed in the next section.
Adding HTML content
The custom page is populated with HTML. The question then becomes, how should the content be generated? There are numerous approaches, two of which are:
- Build your HTML as a long, concatenated string, then assign it to the page.
- Use a templating engine built for dynamically generating HTML, like handlebars.js. For alternatives to handlebars.js search for JavaScript templating engines.
In this document and other examples in the OTT Plugins documentation on this site, the first approach is taken. This works fine for the simple, short examples shown, but for more complex HTML of greater length a templating engine would most likely be a better fit.
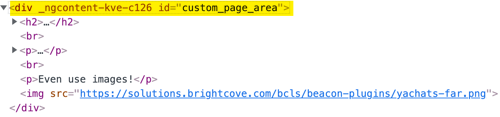
Once you decide how to build your HTML, the next question is how to place it in the custom page? The key to answering this question is the custom_page_area selector. A <div> is created on the custom page as a target for your HTML.
The example at the start of this document shows a custom page with some text and an image. Here is the code that generated that page:
var customPageArea = document.getElementById('custom_page_area'),
  pageContent = '<h2> This is content in the <em>custom page</em> passed as a parameter from a data file</h2><br>'
    + '<p>You can build your HTML in many ways and the page can contain the content you choose. You are NOT limited to the page types shown in the page layout UI.</p><br>'
    + '<p>Even use images!</p>'
    + '<img src="https://solutions.brightcove.com/bcls/beacon-plugins/yachats-far.png">';
customPageArea.insertAdjacentHTML('afterbegin', pageContent);
An explanation of the code follows:
- Line 1: Assign a variable the element (which in this case is a
<div>) which has an ID ofcustom_page_area. - Lines 2-5: Assign a variable the desired HTML where each line of HTML is a separate string concatenated to the other HTML using the JavaScript concatenation operator (a plus sign). You could also just have all the HTML on a single line, but you cannot use separate lines without the string concatenation.
- Line 6: Assign the HTML to the retrieved
<div>using theinsertAdjacentHTML()method.
Styling the HTML
If you wish to style the HTML, you can place the style in the index.css file. For instance, the page shown at the top of this document uses this CSS:
#custom_page_area {
  margin-left: 15px;
  color: darkblue;
  background-color: beige;
}
Module implementation
The following module shows a very simple way to build your HTML and place it in your custom page. This module could also be used to implement your handlebars.js templates to build more sophisticated pages.
const populateCustomPage = () => {

  var customPageArea = document.getElementById('custom_page_area'),
    pageContent = '<h2> This is content in the <em>custom page</em> passed as a parameter from a data file</h2><br>'
      + '<p>You can build your HTML in many ways and the page can contain the content you choose. You are NOT limited to the page types shown in the page layout UI.</p><br>'
      + '<p>Even use images!</p>'
      + '<img src="https://solutions.brightcove.com/bcls/beacon-plugins/yachats-far.png">';
  customPageArea.insertAdjacentHTML('afterbegin', pageContent);

};

export { populateCustomPage };