Introduction
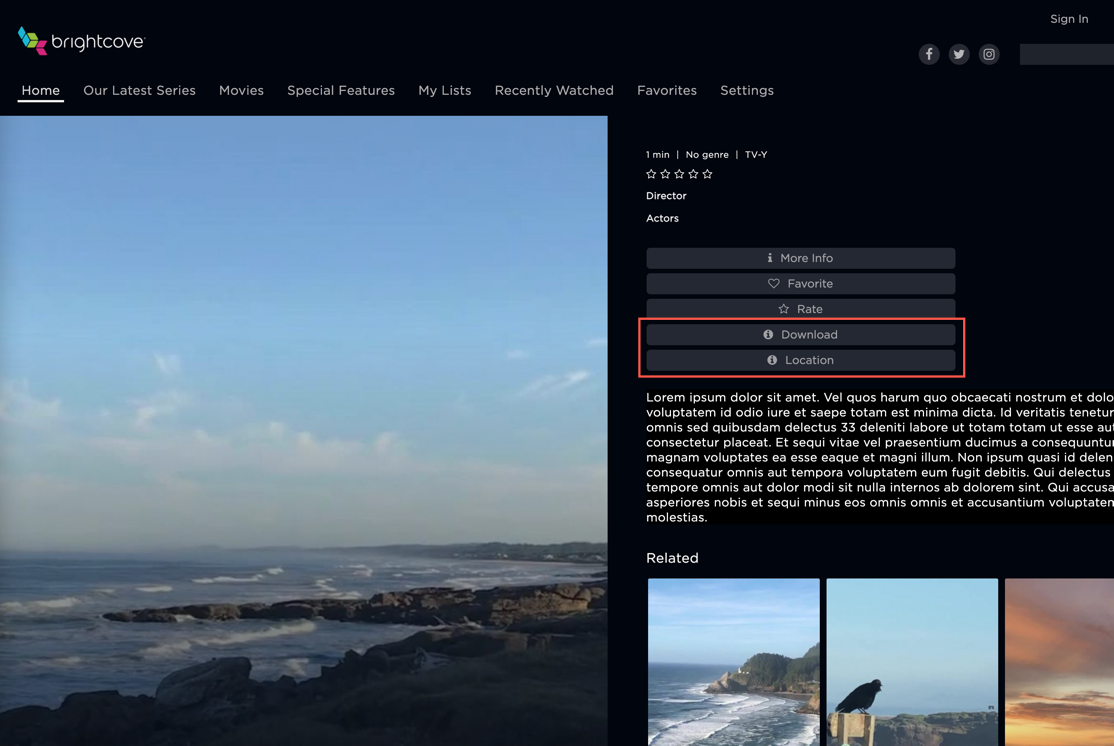
Custom buttons can be added to your app's details page. For example, you can add a Download button and/or a Location button. You are responsible for programming the button functionality.

Use cases
Here are some use cases for custom buttons:
- A Download button to allow users to download a copy of the video
- A Location button to allow users to tag their location on videos
Event flow
This diagram shows the event flow for a custom button:

Triggering events
The following events can be used in your plugin code to control custom buttons:
| Event | Description |
|---|---|
detailsPageAddCustomButton |
Adds a button to the details page buttons list, at the end of the list |
detailsPageRemoveCustomButton |
Removes the button with the defined ID from the buttons list |
Event data
The following data can be passed with the button event:
| Data element | Type | Description |
|---|---|---|
title |
string | The button title displayed in your app |
font_awesome_icon |
string | The Font Awesome ID for the icon displayed in your custom button; leave blank if no icon is to be applied |
element_id |
string | The HTML ID to be applied to your custom button; when calling the remove event, this is the only required field |
Data notes:
- When calling
detailsPageRemoveCustomButton
Code example
Here is the JavaScript code syntax used for creating a custom button:
window.postMessage({
  event: 'detailsPageAddCustomButton',
  data: {
    title: 'Test Button',
    font_awesome_icon: 'fa fa-info-circle',
    element_id: 'TEST_BTN_ID'
  }
}, window.location.origin);
Listening for events
The following events are listened for by the player when button events are dispatched in your OTT plugin code:
| Event | Description |
|---|---|
detailsPageExternalButtonWasClicked |
Called when a user clicks on one of the externally added buttons |
Event data
The following data is returned when the button clicked event is triggered:
| Data element | Type | Description |
|---|---|---|
asset_id |
integer | The ID for the asset (episode/movie/event) associated with the current details page in your app |
element_id |
string | The HTML ID of the button that was clicked |
Code example
Here is the JavaScript code syntax used to listen for a button click event:
switch (event.data.event) {

  case 'detailsPageExternalButtonWasClicked':
    if (event.data.data.element_id == 'download-button') {
      handleButtonClick('Download button');
    };
    if (event.data.data.element_id == 'location-button') {
      handleButtonClick('Location button');
    };
    break;

}
Example
Here is an example of the data object for a button clicked event:
detailsPageExternalButtonWasClicked

Module implementation
The following shows how functions using the side panel are implemented using JavaScript modules. Of course, you may implement your JavaScript in the manner of your choice. Further details on this module implementation can be found in the Implementing OTT Plugin Code Using Modules document.
index.js
Here is our example code:
import { addCustomButtonDetails, addCustomButtonDetailsParams, handleButtonClick } from './button-module.js';

window.addEventListener("message", (event) => {
  const originsAllowed = [
    'your  app URL'
  ];
  if (originsAllowed.includes(event.origin)) {
    switch (event.data.event) {

      case 'detailsPageExternalButtonWasClicked':
        if (event.data.data.element_id == 'download-button') {
          handleButtonClick('Download button');
        };
        if (event.data.data.element_id == 'location-button') {
          handleButtonClick('Location button');
        };
        break;

      case 'onBeaconPageLoad':
        addCustomButtonDetailsParams('Download', 'fa fa-info-circle', 'download-button');
        addCustomButtonDetailsParams('Location', 'fa fa-info-circle', 'location-button');
      break;

    }
  }
},
  false
);| Event | Description |
|---|---|
detailsPageExternalButtonWasClicked |
Listen for this event. When triggered, do the following:
|
onBeaconPageLoad |
Listen for this event. When triggered, do the following:
|
button-module.js
Here is our example code:
const addCustomButtonDetails = () => {

      window.postMessage({
        event: 'detailsPageAddCustomButton',
        data: {
          title: 'Test Button',
          font_awesome_icon: 'fa fa-info-circle',
          element_id: 'TEST_BTN_ID'
        }
      }, window.location.origin);

    };

const addCustomButtonDetailsParams = (pTitle, pFont, pID) => {

  window.postMessage({
    event: 'detailsPageAddCustomButton',
    data: {
      title: pTitle,
      font_awesome_icon: pFont,
      element_id: pID
    }
  }, window.location.origin);

};

const handleButtonClick = (buttonString) => {

  alert('button was clicked ' + buttonString);

};

export { addCustomButtonDetails, addCustomButtonDetailsParams, handleButtonClick };| Function | Description |
|---|---|
addCustomButtonDetails |
Dispatches the detailsPageAddCustomButton event to create a custom button on the details page, at the end of the buttons list.The title, font_awesome_icon and element_id values are passed into this function as strings, using the data object. |
addCustomButtonDetailsParams |
Dispatches the detailsPageAddCustomButton event to create a custom button on the details page, at the end of the buttons list.This function uses the pTitle, pFont and pID parameters to populate the title, font_awesome_icon and element_id values in the data object. |
handleButtonClick |
Displays an alert box with a message identifying the button that was clicked. |
