Introduction
A registered user is someone who has created an account with your Brightcove Beacon app. This can be a free account or a paid subscription.
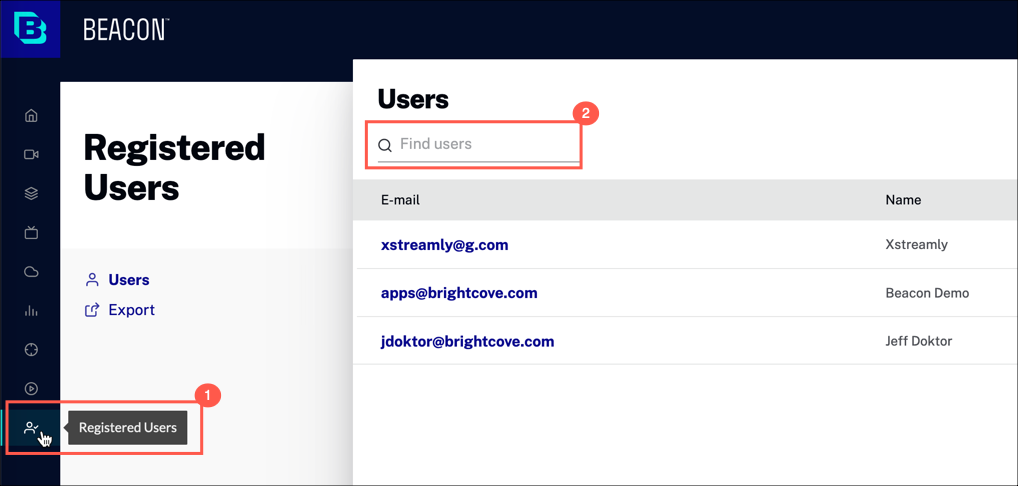
When a registered user has a question or a problem with their account, you can quickly look them up using a smart search, and verify their details. The first thing you will see is a list of registered users.
Click an E-mail link in the list to display more information about the user. For each user, you will have the following tab sections:
- Overview
- Viewing history
- Subscriptions
- Active sessions
- Profiles
- Delete and forget
You can also export detailed data about your registered users. This data can be used to help you manage email marketing campaigns, and customer relationship programs.
Users list
In Beacon Studio, in the primary navigation, click Registered Users to view a list of users for your account.
Actions
For user details, do either:
- Click an E-mail link in the Users list
- In the search box, start typing either an email address or a user name; select a user from the results list
Detailed information about a specific user is described in the following sections of this document.
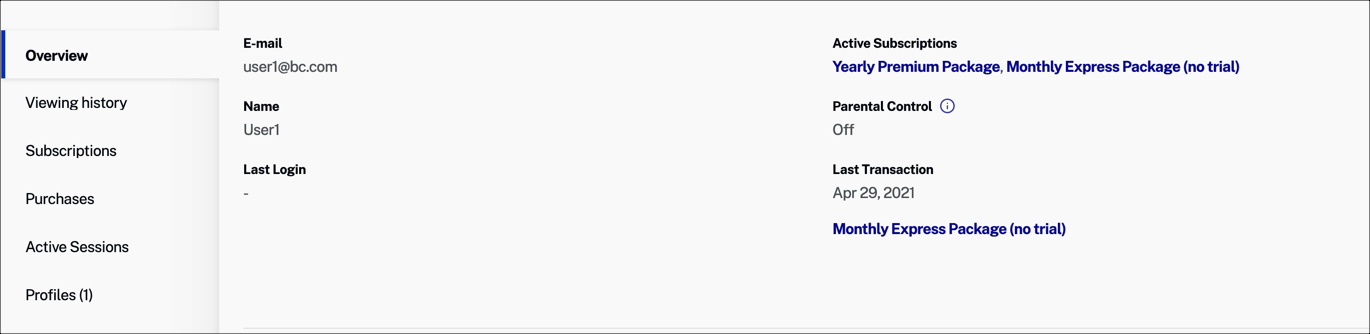
Overview
The Overview tab displays general information about the selected user, including the plan names they have signed up for, and their parental control setting.
Fields
- Email - Email address for this user
- Name - First and last name of the user
- Last Login - Date when the user was last logged into your app
- Role - The role assigned to the user, if none N/A is displayed
- Active Subscriptions - A list of subscription plans for which the user is signed up
- Parental Control - Whether the user has turned on parental controls for their account, and if a pin is required for access
- Last Transaction - The date when the user last performed a monetization transaction
Actions
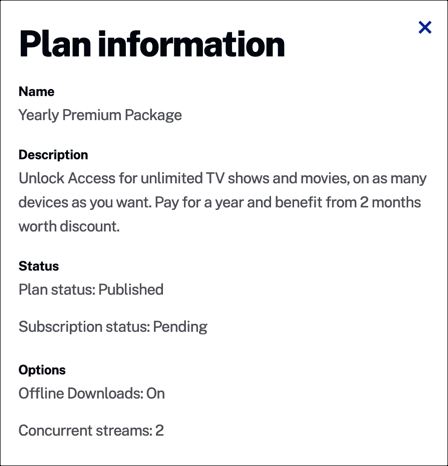
- Click an Active Subscription name to see details
Plan Details
Fields
- Name - Subscription plan name
- Description - Summary of the subscription plan
- Status - Current status of the plan (whether it is published or not), and the user's subscription status
- Options - Additional plan options available for the user
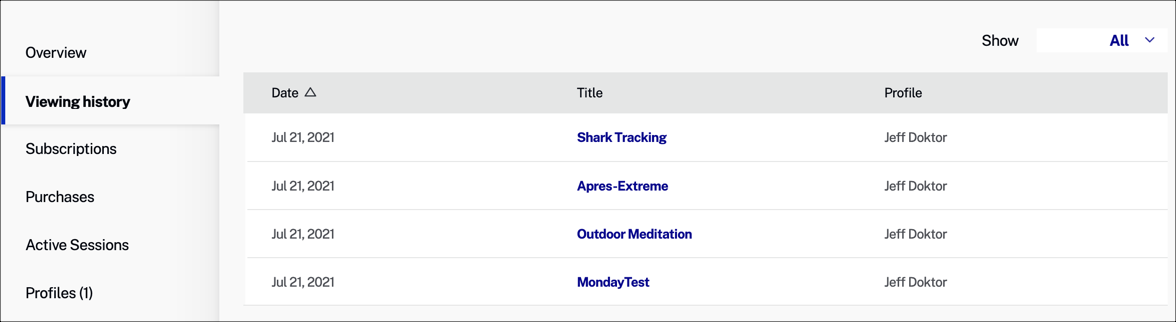
Viewing history
Viewing history displays a list of movies that this registered user has watched. History is captured and saved for 1 year.
Columns
- Date - Date that a movie was viewed; click this column header to control the results sort order (descending or ascending)
- Title - Name of the movie viewed
- Profile - Name of the user profile
Actions
- Use the Show filter dropdown to limit display results
- Click a Title name to see movie details
Movie details
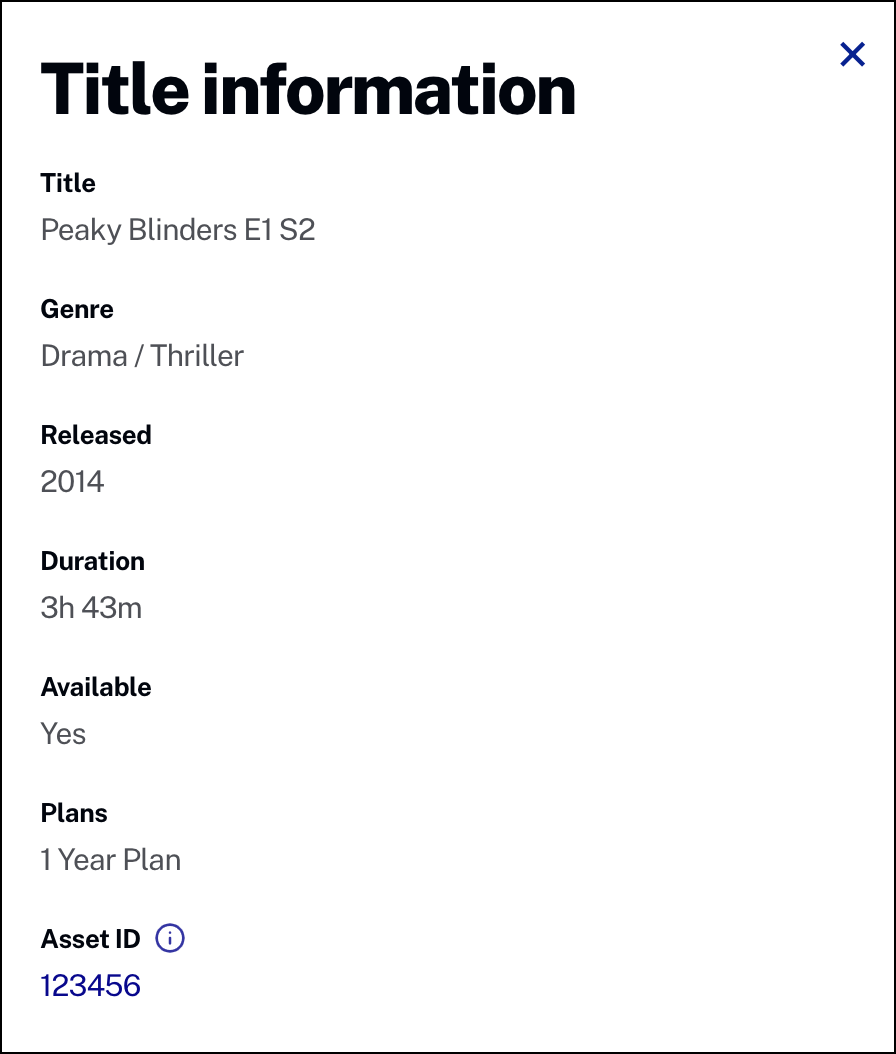
Fields
- Title - Name of the movie, including it's season and episode
- Genre - Descriptive category for the movie
- Released - Year the movie was released
- Duration - Time length of the movie in hours and minutes
- Available - Movie availability
- Plans - A list of plans that the user is subscribed to
- Asset ID - Unique identifier for the movie
Actions
- Click the Asset ID number to view more details in the Media module
Subscriptions
The Subscriptions tab shows a list of subscription plan purchases and changes for a registered user. This includes plan trial periods.
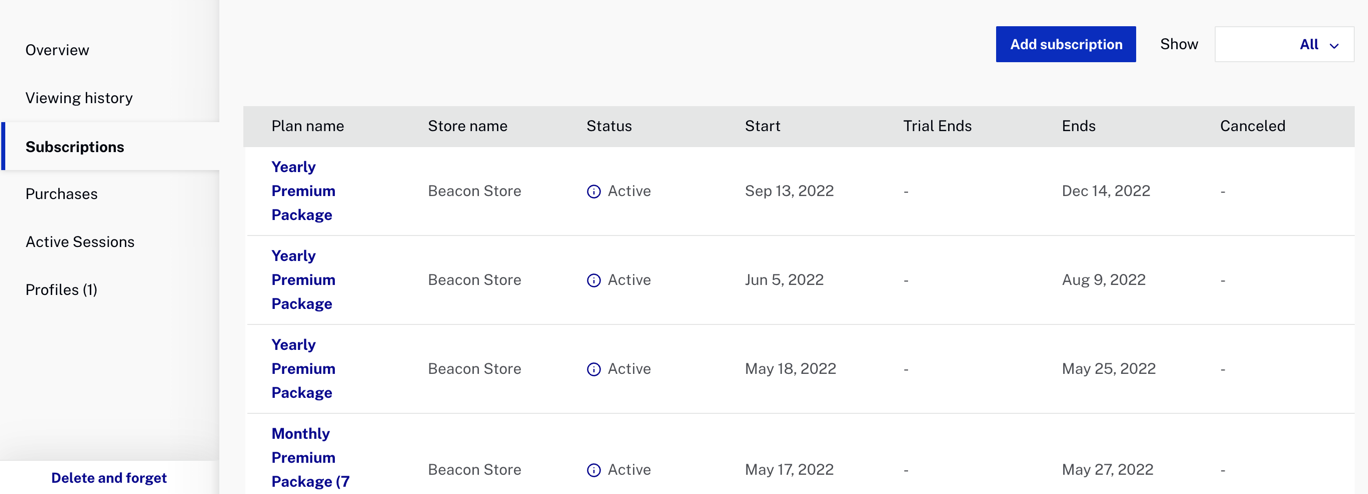
Columns
- Plan name - Subscription plan name
- Store name - App store name
- Status - Current subscription status; values:
- In Trial - User is in a trial period for this plan
- Pending - User payment information is being verified
- Active - User has enrolled in this subscription plan
- Start - Start date for the associated subscription
- Trial ends - End date for the user's trial period
- Ends - End date for the associated subscription
- Canceled - Date that the subscription was canceled
Actions
- Use the Show filter dropdown to limit display results
- Click the Plan name to view more details about the plan
Plan Details
Fields
- Name - Subscription plan name
- Description - Summary of the subscription plan
- Status - Current status of the plan (whether it is published or not), and the user's subscription status
- Options - Additional plan options available for the user
Add subscription
You can select a plan name or, as shown here, you can manually add a subscription:
- Click .
-
Select values for each of the fields in the dialog. All of the fields are required.
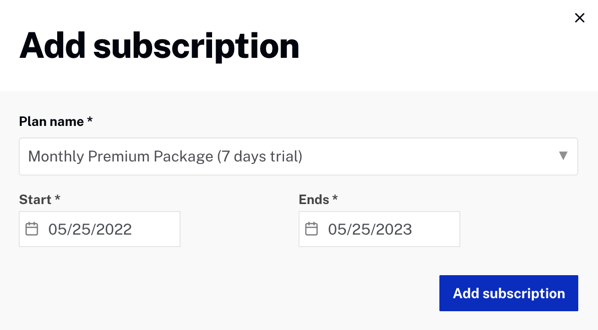
- Plan name - Select a subscription plan name that you have defined in your account
- Start - Enter the date for when the subscription will start
- End - Enter the date for when the subscription will end
- Click .
Purchases
The Purchases tab shows a list of in-app purchases for a registered user.
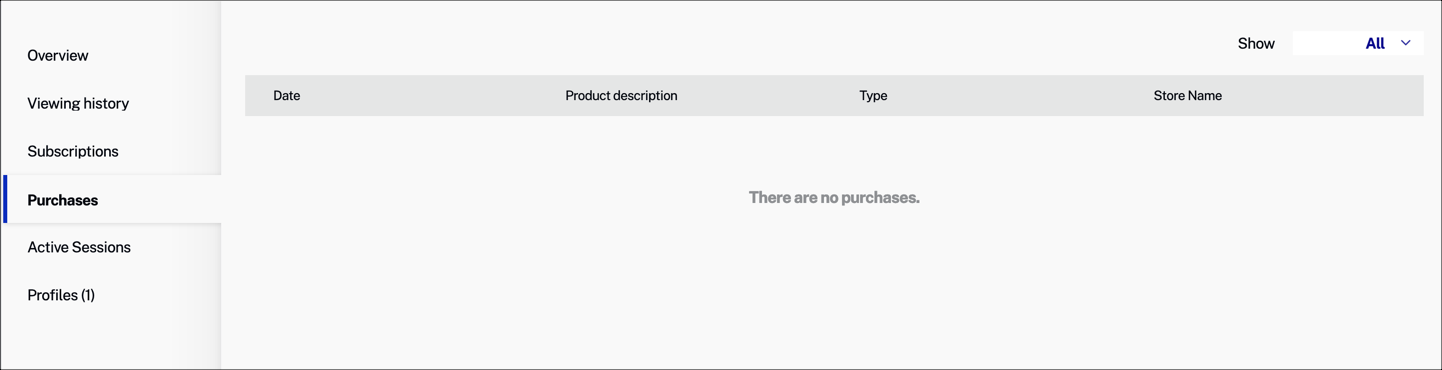
Columns
- Date - Date when the user made an in-app purchase
- Product description - Description for the item purchased by the user
- Type - Type of purchase
- Store Name - Name of the online store where the product was purchased
Active sessions
View a list of active sessions associated with a registered user.
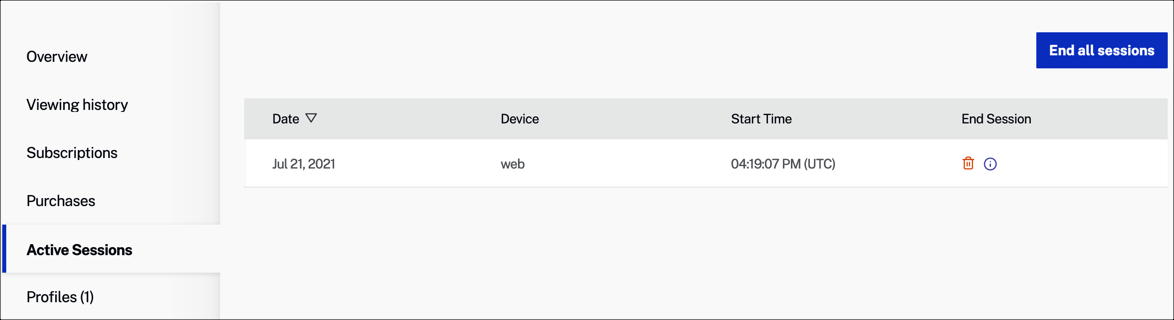
Columns
- Date - Date when a session was started; click this header to control the results sort order (descending or ascending)
- Device - Type of device being used for a session
- Start time - Time when a session was started
- End Session - Click
 associated with a session to delete it
Profiles
View a list of user profiles associated with a registered user.
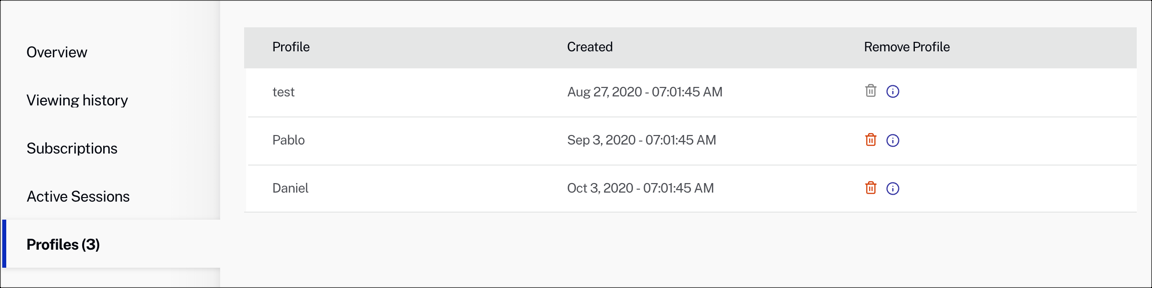
Columns
- Profile - Name of the profile
- Created - Creation date and time
-
Remove Profile - Click
associated with a profile to delete it
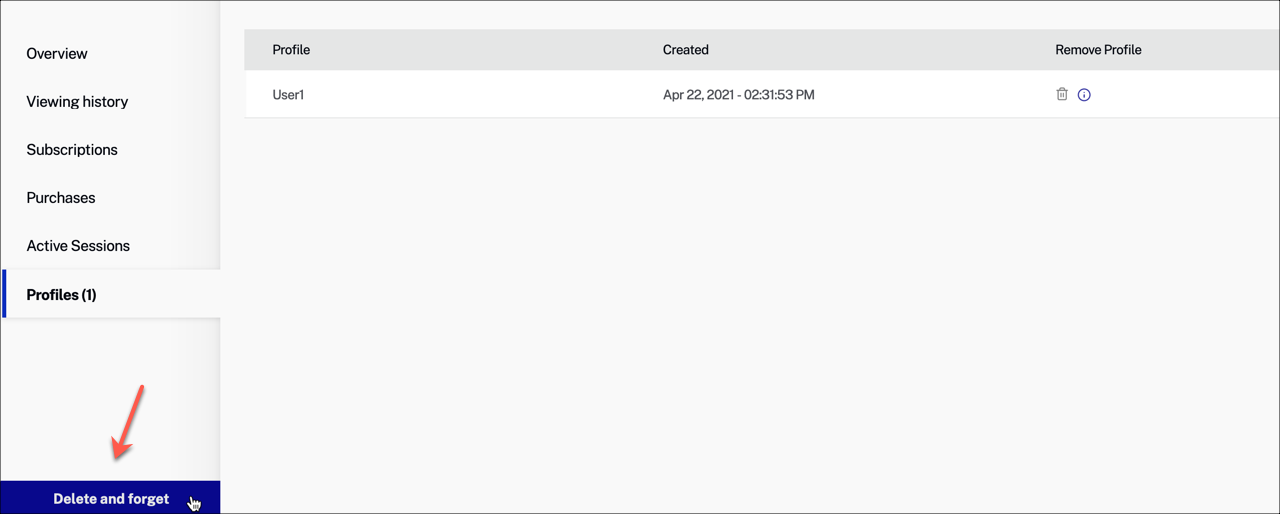
Delete and forget
This action is used for GDPR compliance, when a user requests that their personal data be erased.
Steps
-
Click Delete and forget.
-
To continue, type Delete in the text area.
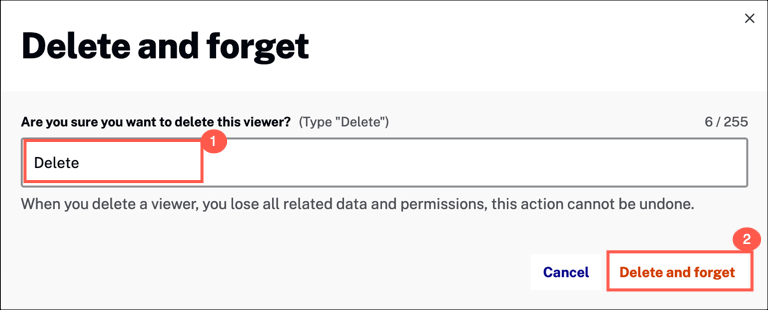
- To confirm, click Delete and forget.