Introduction
The configuration process consists of the following tasks:
- Create one Google Analytics property
- Set up data streams for web and Smart TV
- Create a set of event-scoped custom dimensions
- Create a user-scoped custom dimension
- Create app streams
- Use Google Looker Studio for viewing your analytics data
Required tools
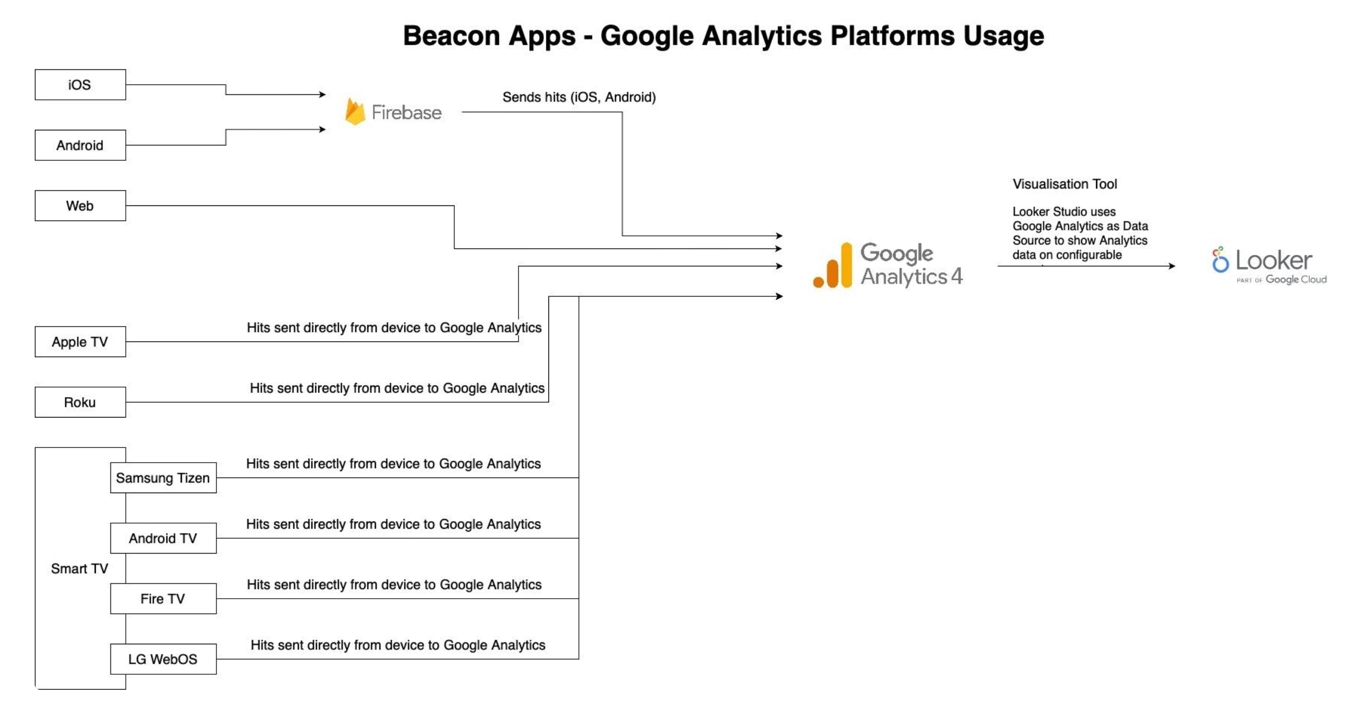
Brightcove uses various tools to implement the collection, manipulation and display of analytics data using Google Analytics. These tools are:
- Google Analytics - A web analytics platform offered by Google as part of their Google Marketing Platform brand.
- Firebase - Firebase is a platform developed by Google for creating mobile and web applications. Firebase includes the Firebase Realtime Database, which is a cloud-hosted database.
- Google Looker Studio - Google Looker Studio is a "free tool that turns your data into informative and fully customizable dashboards and reports that are easy to read and share."
The following diagram details the interaction/flow of these tools when gathering analytics for Brightcove :
Configure Google Analytics
In this section of the document you will configure Google Analytics.
Create a Google Analytics 4 property
The following steps guide you through creating the Google Analytics 4 property.
- Log in to your Google Analytics account.
- Click the Admin (gear) icon on the bottom-left of the screen.
- Click Create Property.

- Enter the Property details.
- Property name - Your property name (Example: Beacon - [[NAME OF YOUR PRODUCT]])
- Reporting time zone - Select your preferred time zone
- Currency - Select a currency value
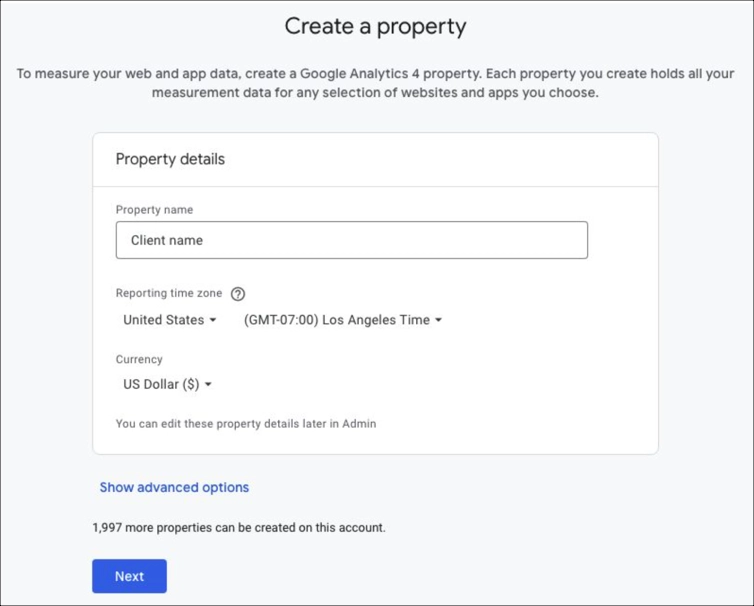
- Click Next.
- Fill in your Business details.
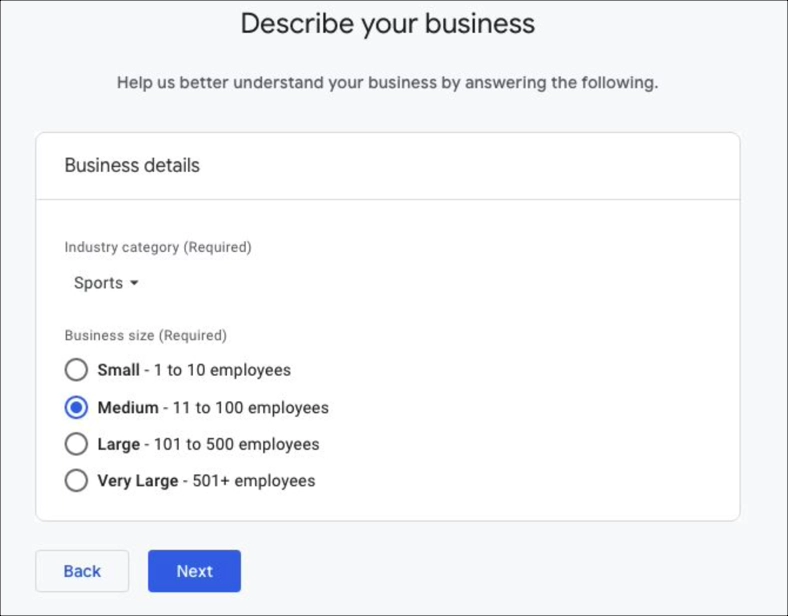
- Click Next.
- Select Examine user behavior.
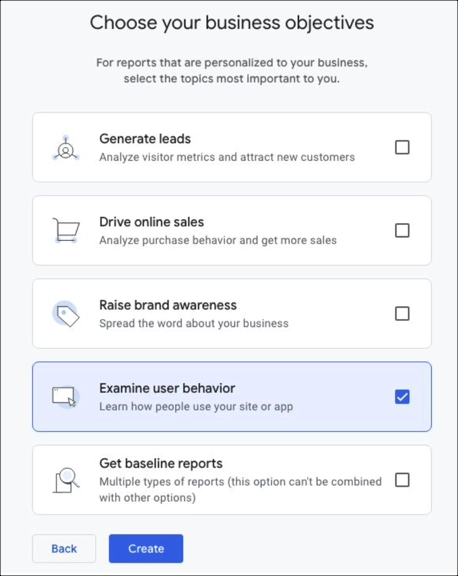
- Click Create.
Set up web data stream
In this section, you will create a web view for the Google Analytics 4 property created in the previous section.
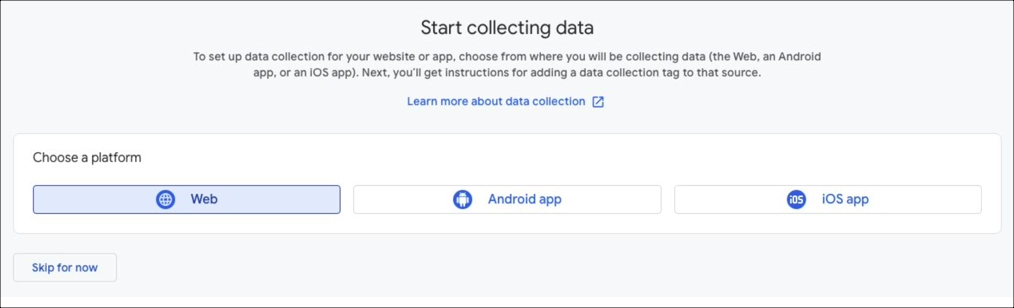
- Return to Google Analytics and navigate to the Start collecting data screen.
- Select Web.
- Setup your web data stream.
- Website URL - Enter your client's domain
- Stream name - Enter the value "Web Stream"
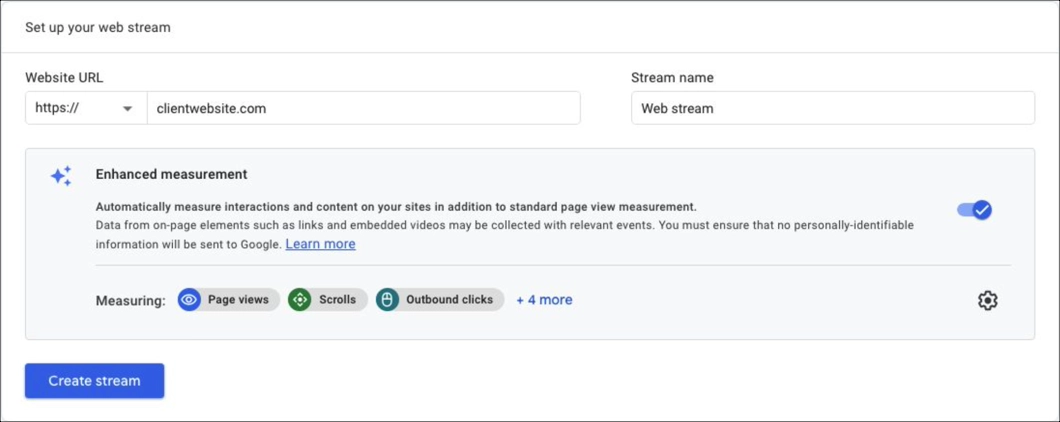
- In the Enhanced measurement section, turn off Video engagement tracking.
- In the bottom right, click the gear icon

- Deselect Video engagement

- In the bottom right, click the gear icon
- Click Create stream.
- From the Stream details, copy the Measurement ID.
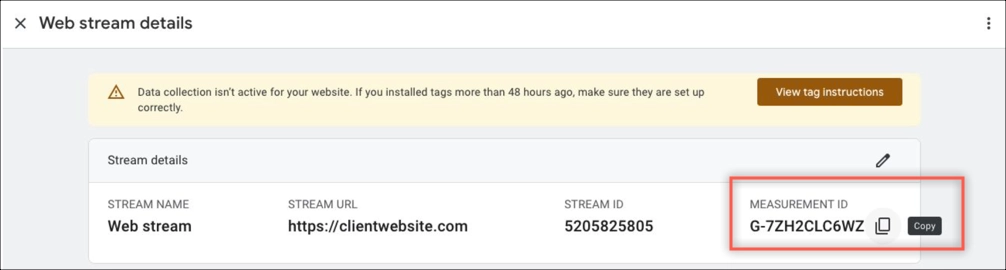
- Save the Measurement ID for later, to deliver to the Brightcove OTT Delivery Team.
- Exit out of Web stream details.
Set up Smart TV data stream
In this section, you will create a Smart TV data stream.
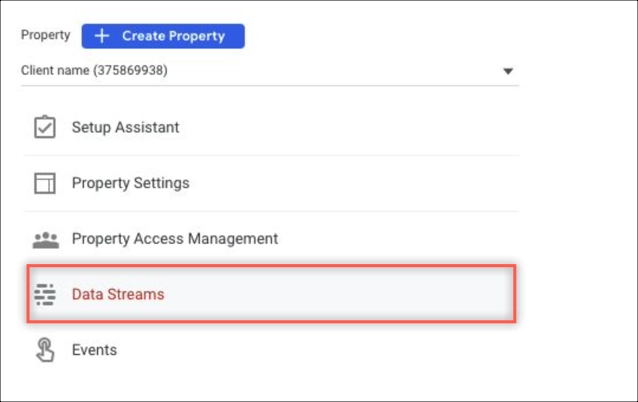
- Return to Google Analytics and navigate to Property Settings.
- Select Data Streams.
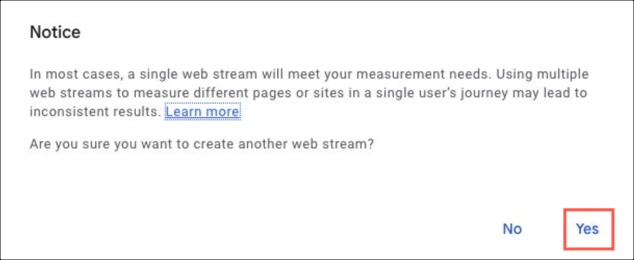
- Expand the Add stream dropdown menu and select Web.

- In the Notice dialog window, click Yes.
- Setup your data stream.
- Website URL - Enter your client's domain
- Stream name - Enter the value "Smart TV stream"
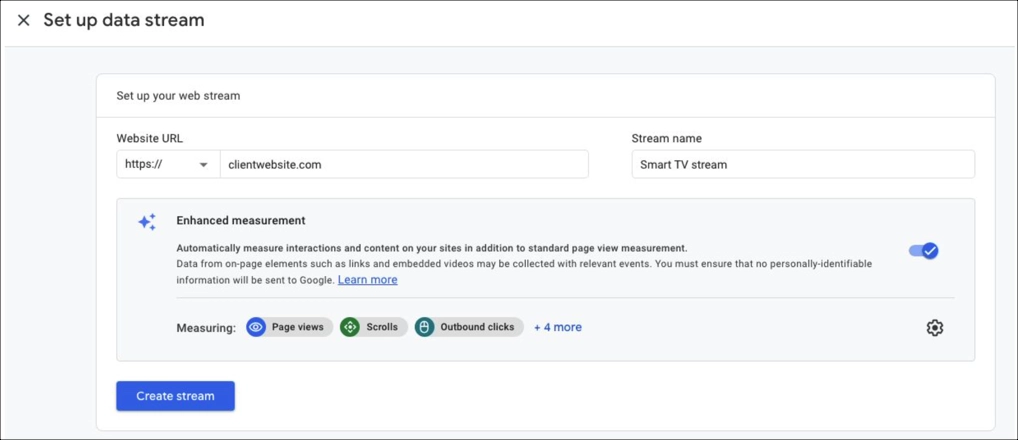
- Click Create stream.
- From the Stream details, copy the Measurement ID.

- Save the Measurement ID for later, to deliver to o the Brightcove OTT Delivery Team.
- While still inside the Smart TV stream details view, at the bottom of the Events section, click Measurement Protocol API secrets.

-
Next, create the Measurement Protocol API secret.
Click Review terms and click I acknowledge.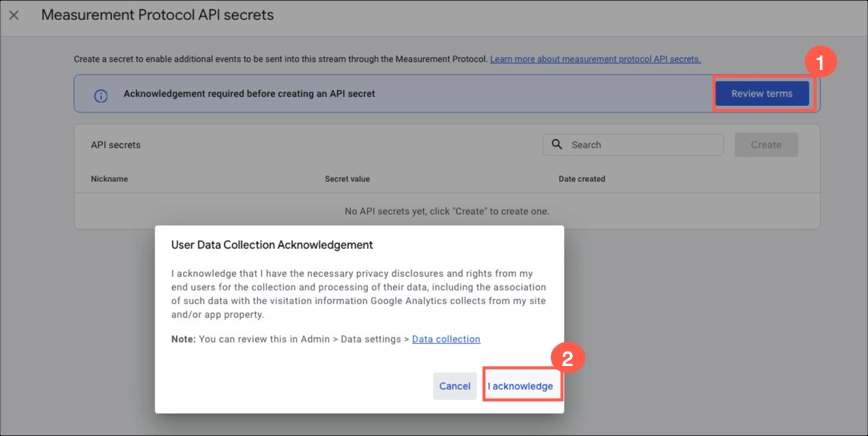
- Click Create, enter the nickname “Smart TV API key 1”, and click Create again.
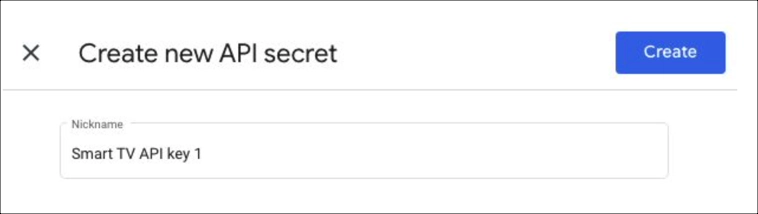
- Copy the Secret value, which you will give to the Brightcove OTT Delivery Team.

Register custom definitions
In this section, you will create custom definitions.
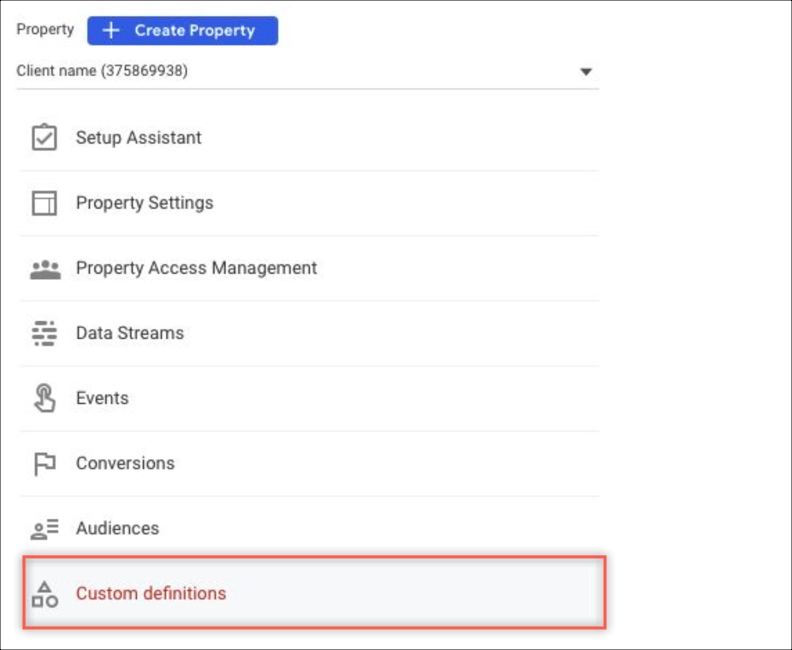
- Return to Google Analytics and navigate to Property Settings.
- In Property Settings, select Custom definitions.
Create event-scoped custom dimensions
- Click Create custom dimensions.
- Use the table below to create each custom dimension:
- Dimension name - Enter a value from the table below
- Scope - Leave value as Event
- Description - Leave field empty
- Event parameter - Select the value from the table below corresponding with the Dimension name
Here's an example for "Streaming platform":

The following table shows custom dimension name and associated event parameter.
Dimension name Event parameter Streaming platform streaming_platform Episode number episode_number Season number season_number Episode title episode_title Program title program_title Genre genre Production year production_year Country origin country_origin Plan name plan_name Content type content_type Item title item_title Payment gateway payment_gateway - Click Save.
Create user-scoped custom dimension
Follow the same steps as above to create a custom definition, but create one more dimension that is User scoped.
- Click Create custom dimensions.
- Create a user-scoped custom dimension:
- Dimension name - Enter "User type"
- Scope - Select User
- Description - Leave field empty
- User property - Select user_type
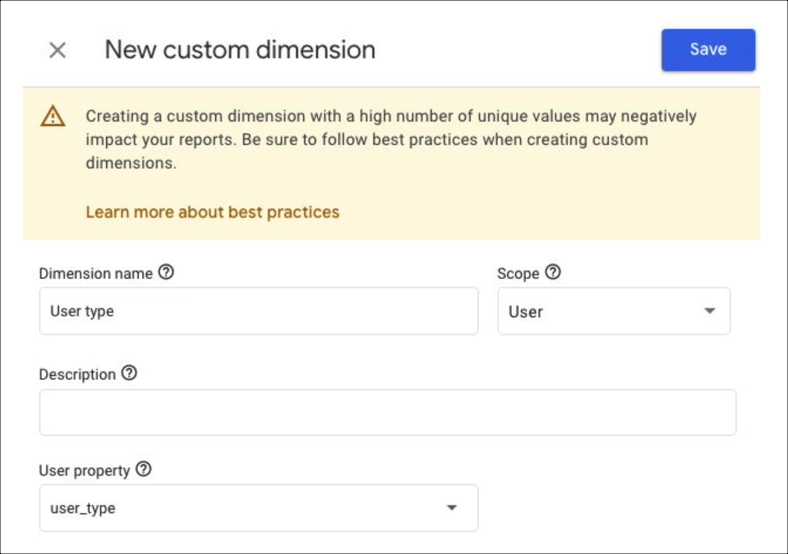
- Click Save.
Create event-scoped custom metric
Next, you'll create a custom metric for the rating stars.
-
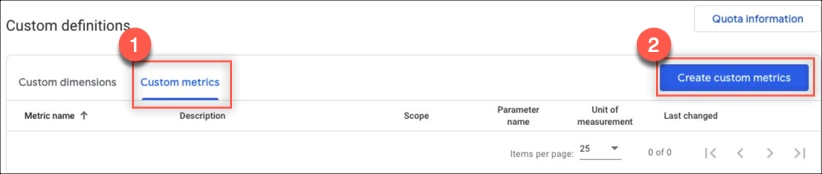
From the Custom definitions screen, do the following:
- Click the Custom metrics header
- Click Create custom metrics
-
Add the following values:
- Metric name - Enter "Stars"
- Scope - Select Event
- Description - Leave field empty
- Event parameter - Select stars
- Unit of measurement - Select Standard
Here's an example for "Streaming platform":
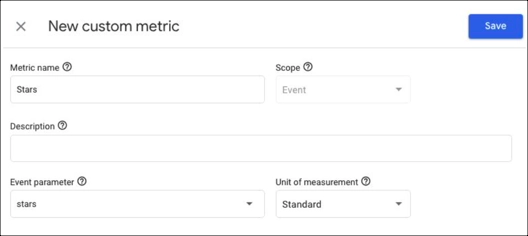
- Click Save.
Increase data retention window
Next you will increase the data retention window. With Google Analytics 4, the default data retention is two months of historical data for standard properties. If you do not change the data retention, you will lose historical data earlier than two months back.
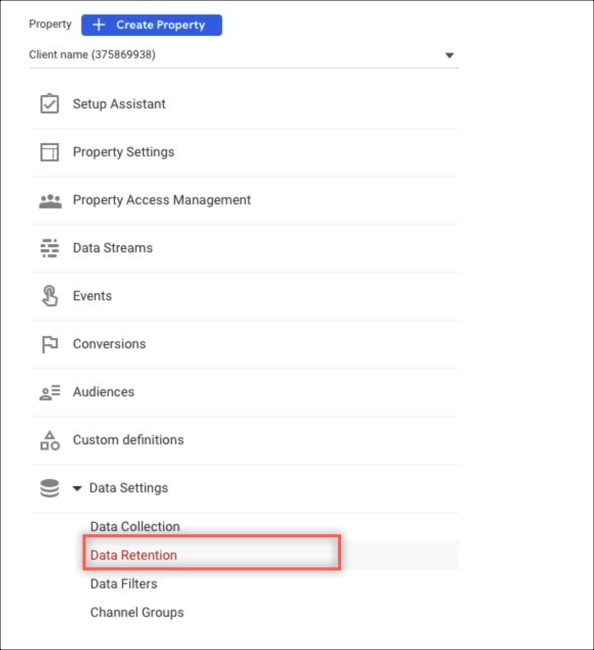
- Return to Google Analytics and navigate to Property Settings.
- In Property Settings, under Data settings, select Data Retention.
- Change Event data retention from 2 months to 14 months.
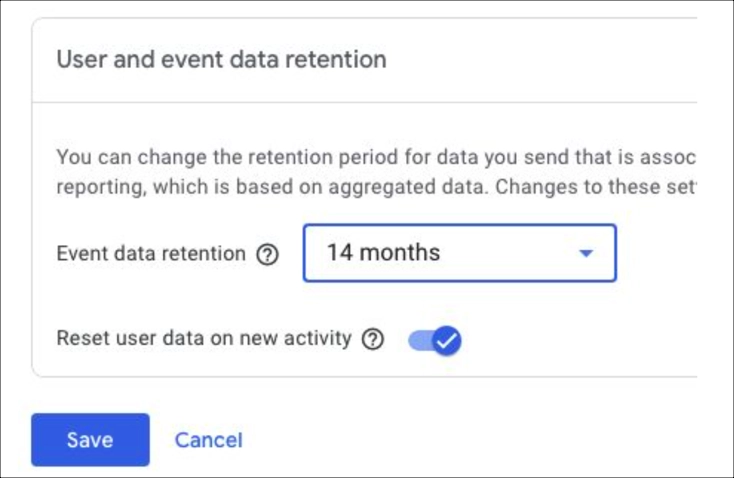
- Click Save.
Create app streams
Next, you will work with the Brightcove OTT Delivery Team to create your app streams.
- Ask the Brightcove OTT Delivery Team to link your Firebase project with your new GA4 property.
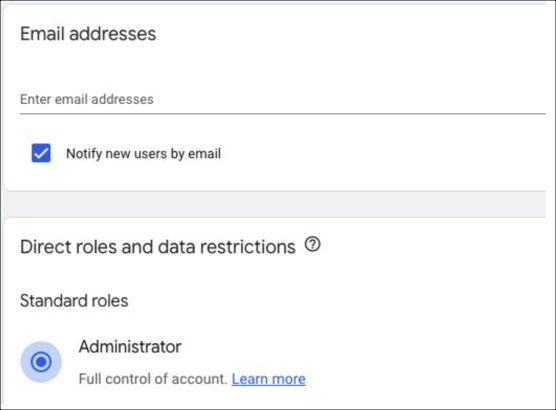
- Brightcove may need access to your Google Analytics account. To grant access, do the following:
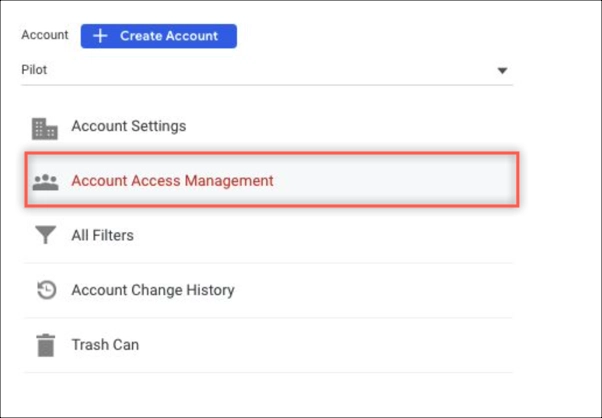
- Return to Google Analytics and navigate to Admin.
-
Select Account Access Management.
-
Add email as Administrator.