
Introduction
The configuration process consists of the following tasks:
- Create four Google Analytics properties.
- Create a set of custom dimensions and one custom metric for each property.
- Create four Google Tag Manager containers.
- Configure Google Tag Manger for each container.
- Configure Firebase to assist in analytics collection with iOS and Android.
- Install templates in Google Data Studio for viewing your analytics data.
Required tools
Brightcove uses various tools to implement the collection, manipulation and display of analytics data using Google Analytics. These tools are:
- Google Analytics - A web analytics platform offered by Google as part of their Google Marketing Platform brand.
- Google Tag Manager - First, understand that tags are snippets of code which are added to a site to collect information and send it to third parties. Tags are use for numerous reasons, including scroll tracking, monitoring form submissions, conducting surveys, etc. With Google Tag Manager you can "manage and update tags quickly and make more informed decisions faster. Tag Manager integrates with all Google and third-party tags, and gives you complete control over when and how your tags fire."
- Firebase - Firebase is a platform developed by Google for creating mobile and web applications. Firebase includes the Firebase Realtime Database, which is a cloud-hosted database.
- Google Data Studio - Google Data Studio is a "free tool that turns your data into informative, easy to read, easy to share, and fully customizable dashboards and reports."
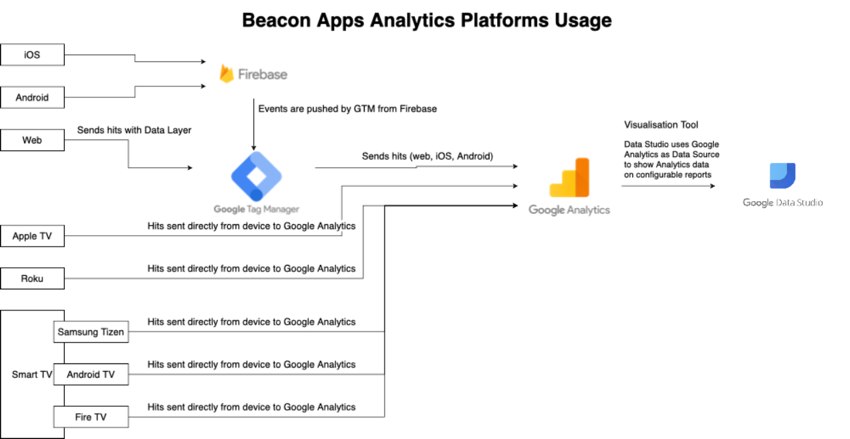
The following diagram details the interaction/flow of these tools when gathering analytics for Brightcove Beacon:
Obtain templates and configuration files
There are a number of files/URLs you need to successfully complete your setup of analytics for Brightcove Beacon. The files/URLs are detailed in the following bullets. You need to contact your Brightcove onboarding manager to obtains these files/URLs. You will receive:
- URLs to three pre-built Google Analytics Dashboard configurations, one each for mobile, web and smart tv.
- Four JSON files which configure each of the four containers created in Google Tag Manager.
- URLs to three pre-built Google Data Studio templates, one each for mobile, web and smart tv.
Directions for installing/using each of the files/URLs appear in the appropriate sections later in this document.
Configure Google Analytics
In this section of the document you will configure Google Analytics, which includes the following tasks:
- Create four Google Analytics properties.
- Create a mobile view for the iOS and Android properties
- Create a set of custom dimensions for each property.
- Create a single custom metric for each property.
- Import three Brightcove created dashboard configurations, one each for mobile, web and smart tv.
Create four properties
You need to create these four properties:
- Beacon Android
- Beacon iOS
- Beacon STV (Smart TV)
- Beacon Web
The following steps guide you through creating the Beacon Android property. You will need to create the others following the same process.
- Log in to your Google Analytics account.
- Click the Admin (gear) icon on the bottom-left of the screen.
- On the top of the middle column, click Create Property.
- In the Property setup, supply the Property name, for the first property, use Beacon Android.
- Supply the Reporting time zone.
- Supply the Currency.
- Click the Show advanced options link.
- Turn on Create a Universal Analytics property.
- Enter your website's URL.
- Click the Create a Universal Analytics property only radio button.
- Be sure your property information is filled in similar to the following:
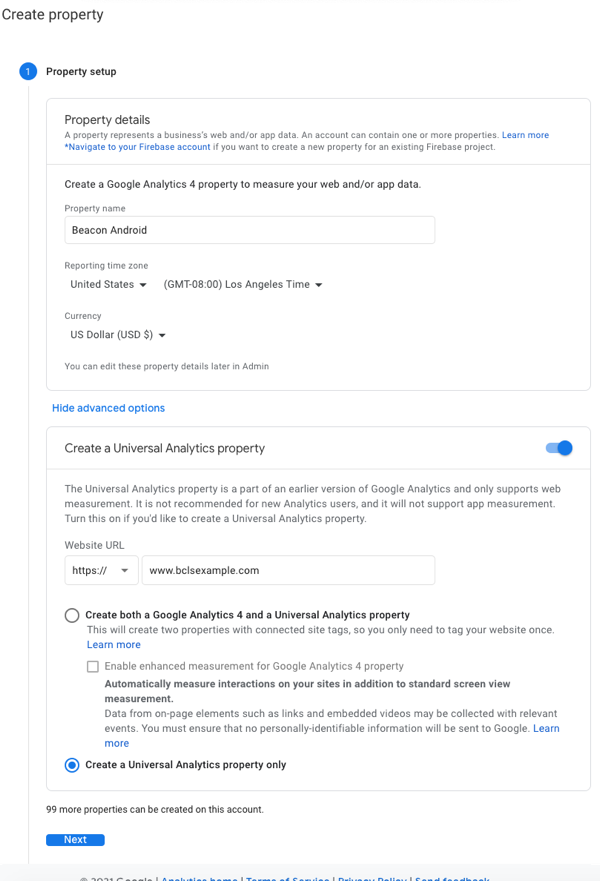
- Click Next.
- Complete the Business information form with your data.
- Click Create.
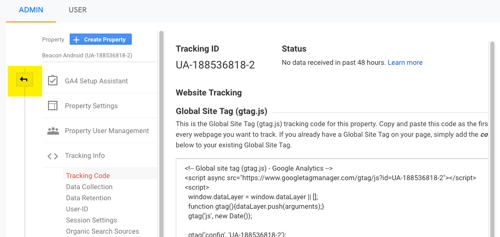
- Read any details you wish about your new property.
- Click the back arrow, highlighted in the following screenshot:
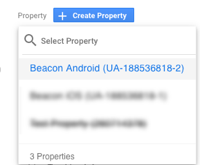
- Just below the Create Property you clicked earlier, click the down arrow to be sure your property was correctly created.
- Perform the proceeding steps to create the three other required properties:
- Beacon iOS
- Beacon STV
- Beacon WEB
Create mobile view for iOS and Android
For mobile platforms, iOS and Android, you need to create a mobile view in each of those properties. You do not need to complete the steps in this section if you do not have mobile apps.
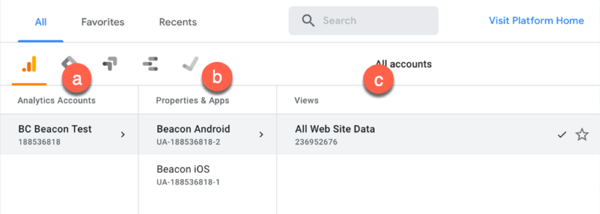
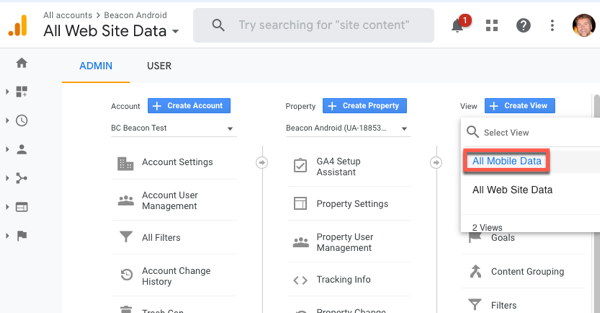
- Click on the dropdown (highlighted in yellow in the screenshot) to see all your Google Analytics accounts, properties and views.
- From the three-paneled dropdown, select:
- Your Brightcove Beacon account
- The Beacon Android property
- The All Web Site Data view
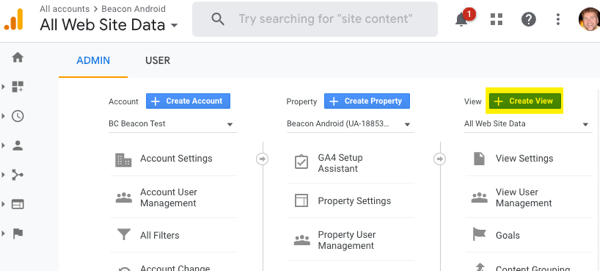
- Click the Admin (gear) icon on the bottom-left of the screen.
- At the top of the third column, click Create View.
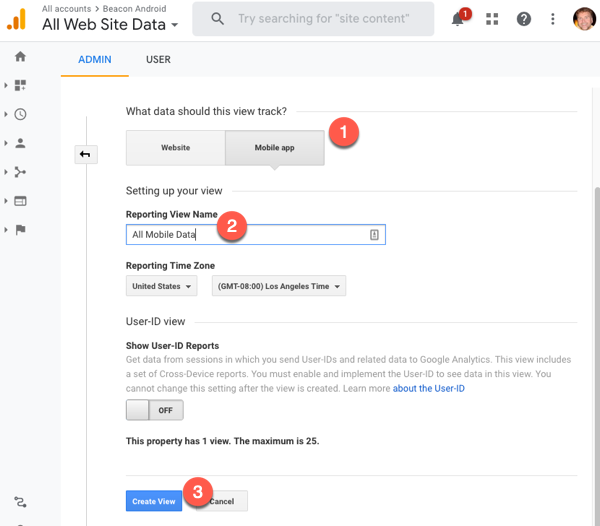
- Fill in the from following these steps:
- Click the Mobile app button for the type of data to track.
- Supply a name for your view. A logical name would be All Mobile Data.
- Click Create View.
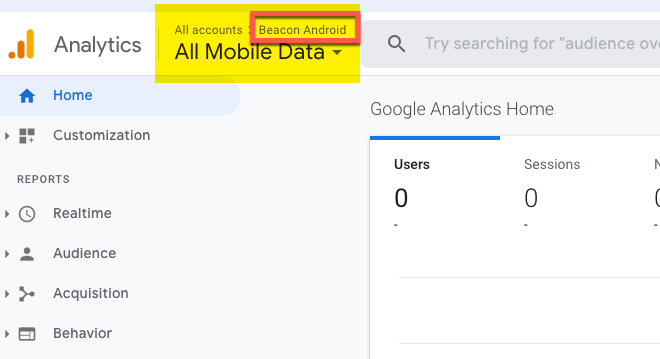
- Change the view to the newly created mobile view.
- Follow the same steps in this section of the document to create a mobile view for the iOS property.
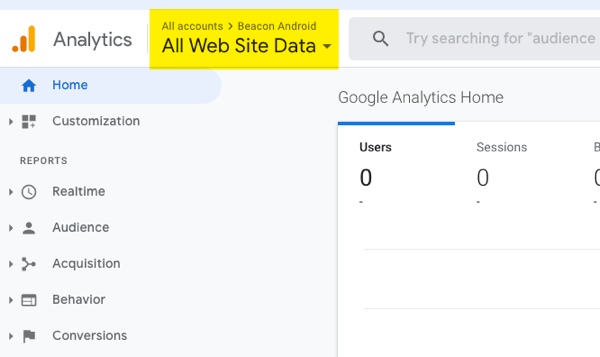
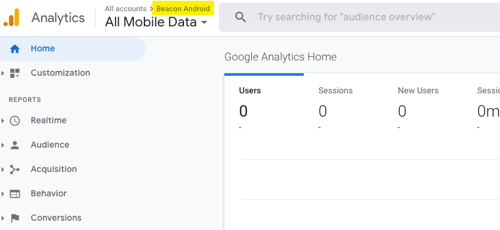
When working with your accounts, make sure when selecting an account/property/view your mobile properties use the All Mobile Data view and the web and STV accounts use the default All Web Site Data, as shown here:
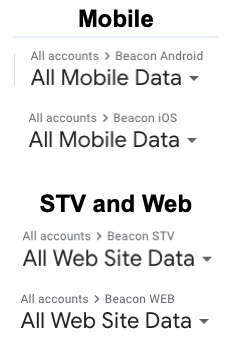
Note the iOS and Android views will have All Web Site Data views, as those are created by default when creating the property
Create custom metric and dimensions
Now for each property you need to create a set of custom dimensions and one custom metric.
This section will be organized in the following manner:
- Steps will be shown how to create a single custom dimension.
- Steps will be shown how to create a single custom metric.
- A table will show the dimensions required for the properties Beacon Android and Beacon iOS.
- A table will show the dimensions required for the properties Beacon STV and Beacon WEB.
- A table will show the single metric that all four properties must have.
You will then need to create the dimensions and metric for each of the four properties.
Creating a custom dimension
- Select one of your properties from the account/property/view selector for which you want to create the custom dimensions.
- Click the Admin (gear) icon on the bottom-left of the screen.
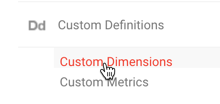
- Near the bottom of the middle column, under Custom Definitions, click Custom Dimensions
- Click NEW CUSTOM DIMENSION.
- For the Name enter Episode Number.
- From the Scope dropdown, select Hit.
- Leave the dimension Active.
- Click Create.
- From the example code screen, click Done.
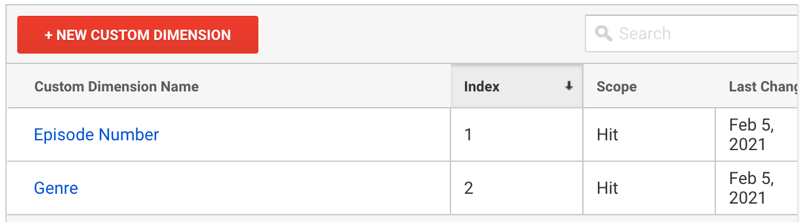
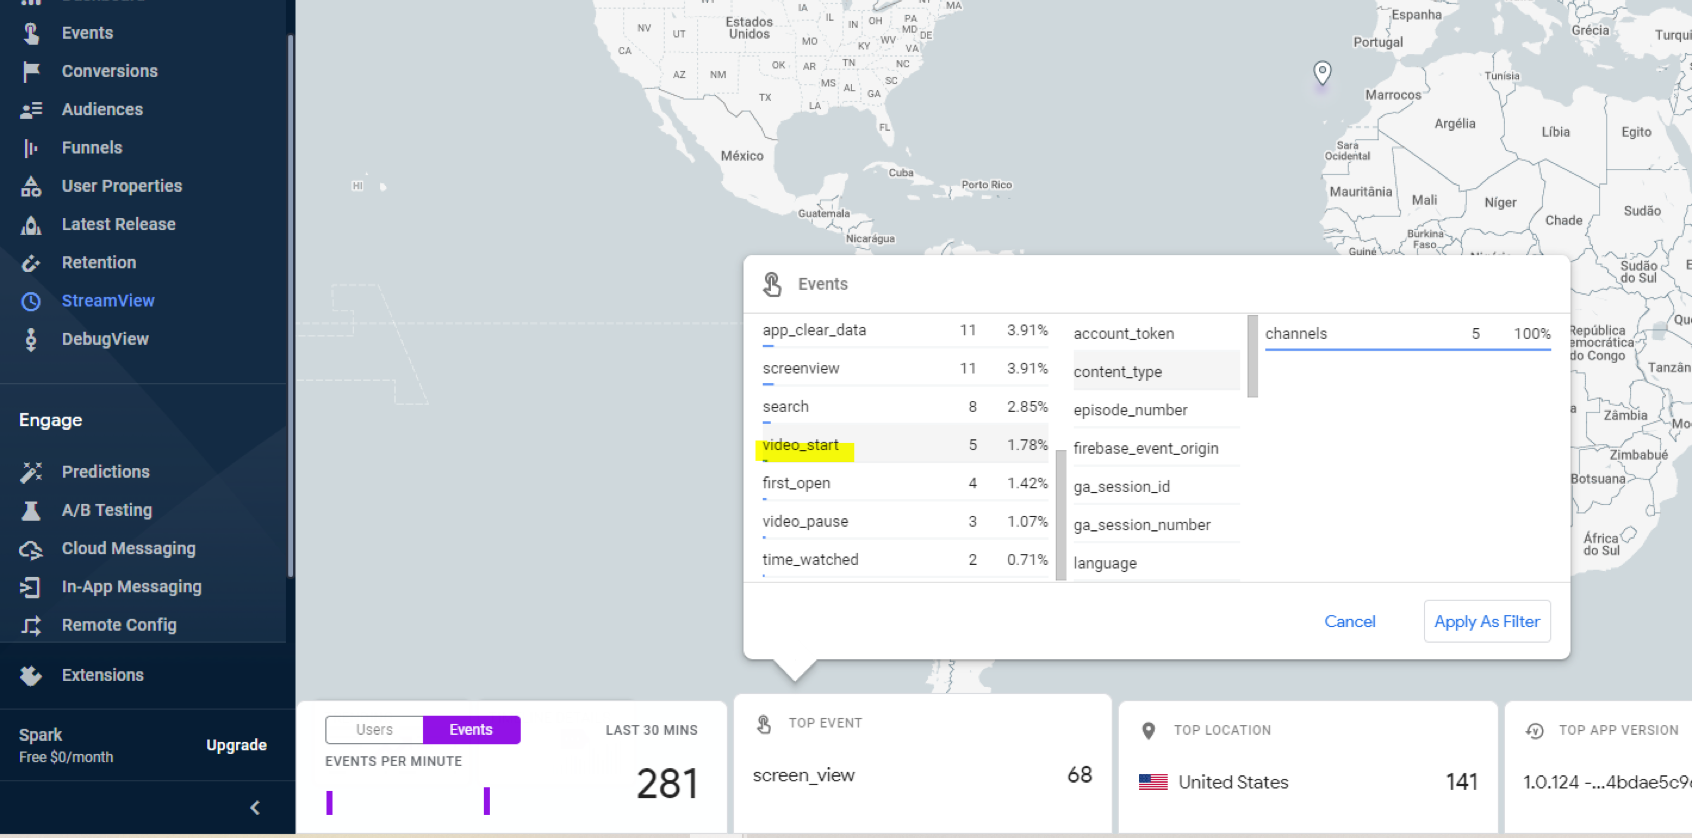
- You will see your newly created dimension in a list, as shown here:
- To create another dimension click NEW CUSTOM DIMENSION.
Creating a custom metric
- Select one of your properties from the account/property/view selector for which you want to create the custom metric.
- Click the Admin (gear) icon on the bottom-left of the screen.
- Near the bottom of the middle column, under Custom Definitions, click Custom Metrics
- Click NEW CUSTOM METRIC.
- For the Name enter Time Watched.
- From the Scope dropdown, select Hit.
- For the Formatting Type, select Time.
- Leave the dimension Active.
- Click Create.
- From the example code screen, click Done.
- You will see your newly created metric in a list.
Android and iOS dimensions and metric
The following table displays the custom dimensions that must be added to the Beacon Android and Beacon iOS properties.
| Custom Dimension Name | Index | Scope |
|---|---|---|
| Episode Number | 1 | Hit |
| Genre | 2 | Hit |
| Production Year | 3 | Hit |
| Country of Origin | 4 | Hit |
| Asset ID | 5 | Hit |
| Login State | 6 | Session |
| Language | 7 | Session |
| User Type | 8 | Session |
| Content Provider | 9 | Hit |
| Series Title | 10 | Hit |
| Episode Title | 11 | Hit |
| Season Number | 12 | Hit |
| Timestamp | 13 | Hit |
| Streaming Time | 14 | Hit |
| Account Token | 15 | User |
| Profile Token | 16 | User |
STV and WEB dimensions and metric
The following table displays the custom dimensions that must be added to the Beacon STV and Beacon Web properties.
| Custom Dimension Name | Index | Scope |
|---|---|---|
| User ID | 1 | User |
| Platform | 2 | Session |
| Account Token | 3 | User |
| App Version | 4 | Session |
| Episode Number | 5 | Hit |
| Season Number | 6 | Hit |
| Episode Title | 7 | Hit |
| Program | 8 | Hit |
| Device Model | 9 | Session |
| Genre | 10 | Hit |
| Production Year | 11 | Hit |
| Country of Origin | 12 | Hit |
| Keyword | 13 | Hit |
| OS Version | 14 | Session |
| OS Language | 15 | Session |
| Account Number | 16 | Session |
| Language | 17 | Session |
| User Type | 18 | Session |
| Content Type | 19 | Hit |
| Content Provider | 20 | Hit |
Custom metric
The following table display the single custom metric that must be added to all four properties.
| Custom Metric Name | Index | Scope | Formatting Type |
|---|---|---|---|
| Time Watched | 1 | Hit | Formatting Type |
Import dashboard configurations
In the Obtain templates and configuration files section earlier in this document, you requested files/URLs from your onboarding manager. Three of the URLs are as follows:
- Mobile: https://analytics.google.com/analytics/web/template?uid=QTJbSdv3Sk6gvpa4Go_CRQ
- Web: https://analytics.google.com/analytics/web/template?uid=pIoBH8hYRSO3JZL4WbFTlA
- Smart TV: https://analytics.google.com/analytics/web/template?uid=eZhlzo76QtSn5BNi-rXJyQ
To use the configurations, perform the following steps:
- Note the use for the configuration, mobile, web or smart tv, then click on the URL.
- In a new browser tab, be sure you are seeing the following:
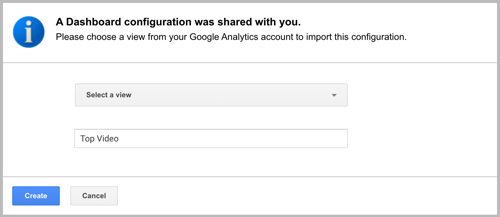
- From the Select a view drop down, choose the matching property, mobile (iOS and Android), web or smart tv.
- Change the name of the configuration if you choose.
- Click Create.
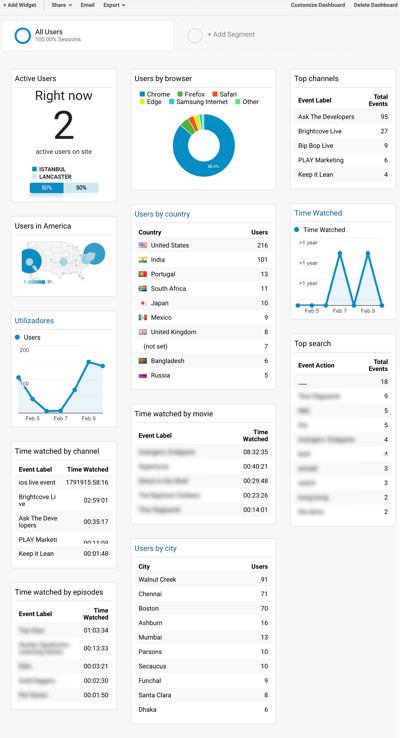
- Be sure the configuration opens. An example is shown here:
Configuring Google Tag Manager
In this section of the document you will perform the following tasks:
- Create four containers, one for each property created earlier.
- Import the configuration JSON files which were emailed to you are part of the Obtain the templates and configuration files section above.
- Enter your tracking ID, copied from your Google Analytics account, into each of the containers' Tracking Code variable.
- Publish your containers.
Create containers
- Review Google's documentation to Setup and install Tag Manager.
-
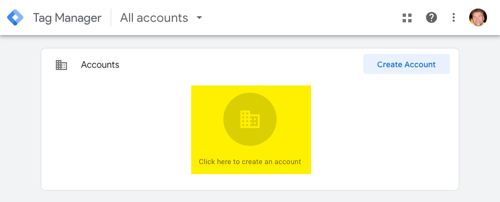
In Tag Manager, create an account or use an existing account. To create a new account, select the Create Account button.
By default, a new container is created for a new account. You will create additional containers within each account.
-
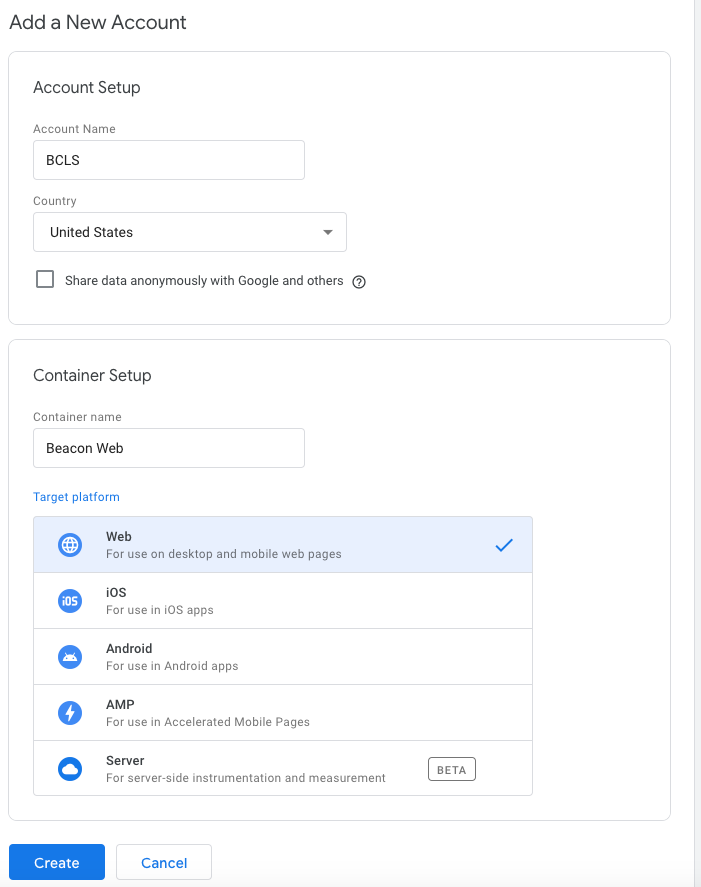
Enter values for your new account page:
- Account Name: Your company name, or perhaps Beacon.
- Country: Home country for your company.
- Container Name: Beacon WEB You will be creating a container for each property.
- Target Platform: Web
- Be sure your container information is filled in similar to the following:
- Click Create.
- Click OK to close the dialog that opens.
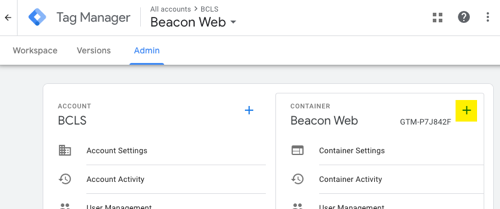
- From the Workspace, click Admin.
- Click the plus sign to add another container.
- Complete the form and click Create to create the iOS container.

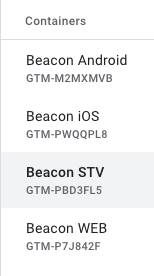
- Be sure the following four containers are created with the correct Target Platform.
Container Name Target Platform Beacon Android Android Beacon iOS iOS Beacon STV Web Beacon WEB Web - From the Workspace, use the account dropdown at the top of the page to be sure all containers have been created.
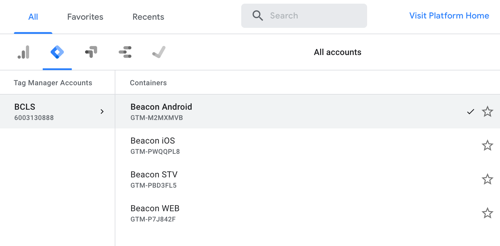
- At this point it is critical you take a screen shot of this dropdown. The Brightcove Beacon engineers need this data, that being the container names and associated GTM ID. You will send this file to your onboarding manager along with other files downloaded, as explained in the Publish each container section that comes later in this document. Please be sure the screenshot is clear and legible:
Import configuration files
Perform the following steps to import the configuration files for your containers:
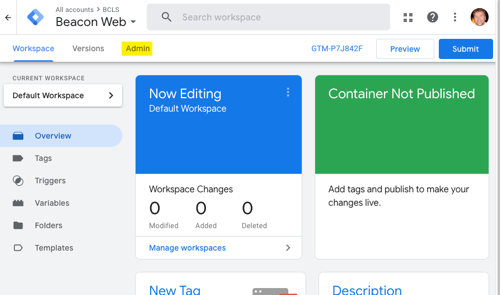
- From the Workspace, click Admin.
- Check which container you are now configuring, then click Import Container.
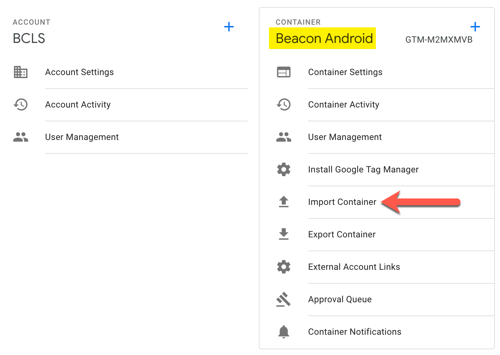
- Click Chose container file, and select the correct JSON file for this container.
- For Choose workspace, click Existing, then from the dialog that opens select Default Workspace.
- For Choose an import option, click the Overwrite radio button.
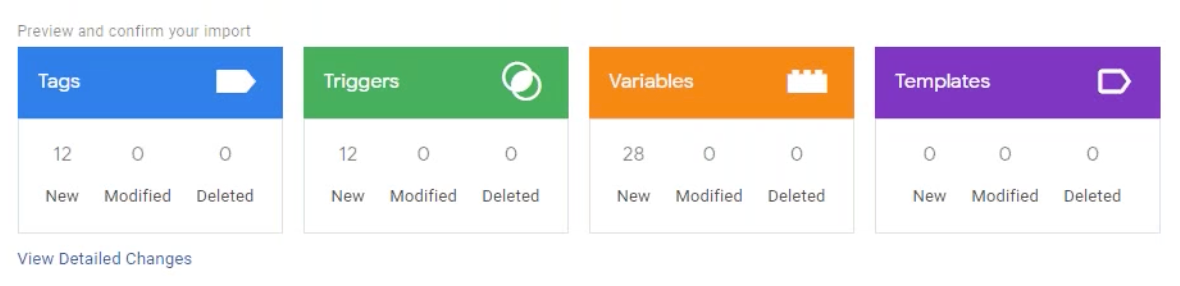
- Be sure you see information about tags, triggers, variables and templates.
- Click Confirm, and you will be taken back to the Workspace..
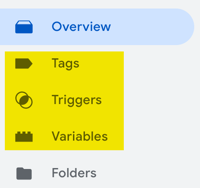
- In the Workspace, click on Tags, Triggers and Variables to confirm the import was successful.
- You now need to import the correct JSON file for each container.
Enter tracking ID
You will now copy from Google Analytics the tracking ID for each property, then paste it into the corresponding container.
- Log in to Google Analytics.
- Use the account/property selector at the top of the page to choose the Beacon Android property.
- Click Admin.
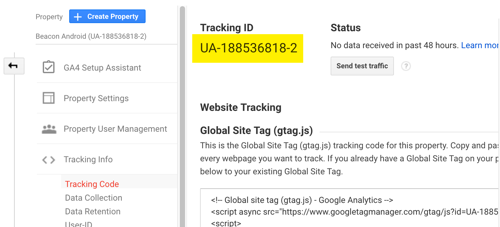
- From the Property column first click Tracking Info then Tracking Code.
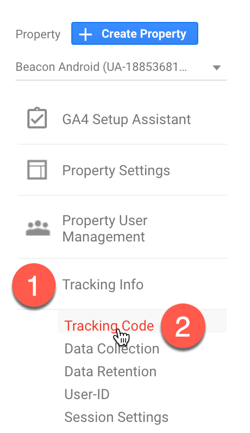
- Copy the Tracking ID.
- Return to Google Tag Manager.
- Be sure you are editing the Beacon Android container.
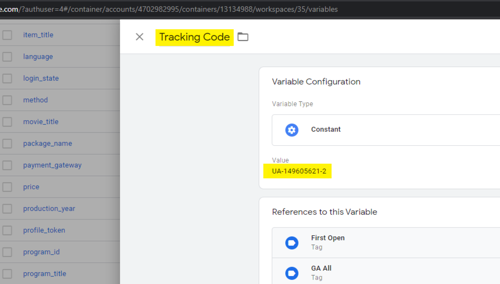
- Click Variables from the left side navigation.
- Click the Tracking Code variable.
- Paste the copied tracking ID from Google Analytics into the Value form field.
- You now need to paste the corresponding tracking ID into the Tracking Code variable in each container.
Publish each container
The last step you need to do in Google Tag Manger is submit each container for publishing. The following steps guide you through that process:
- Return to your Workspace.
- Note the container you are in.
- On the top right of the UI, click Submit.
- Be sure the Publish and Create Version button is selected.
- If you choose, add a version name and version description.
- Click Publish.
- If you did not provide a version name and description, you be asked again. Skip if you are sure you do not want those.
- Be sure the information returned about your container is correct.
- For iOS and Android containers: Click Download in the top right of the UI to download the associated file. This file will need to be sent to your onboarding manager.
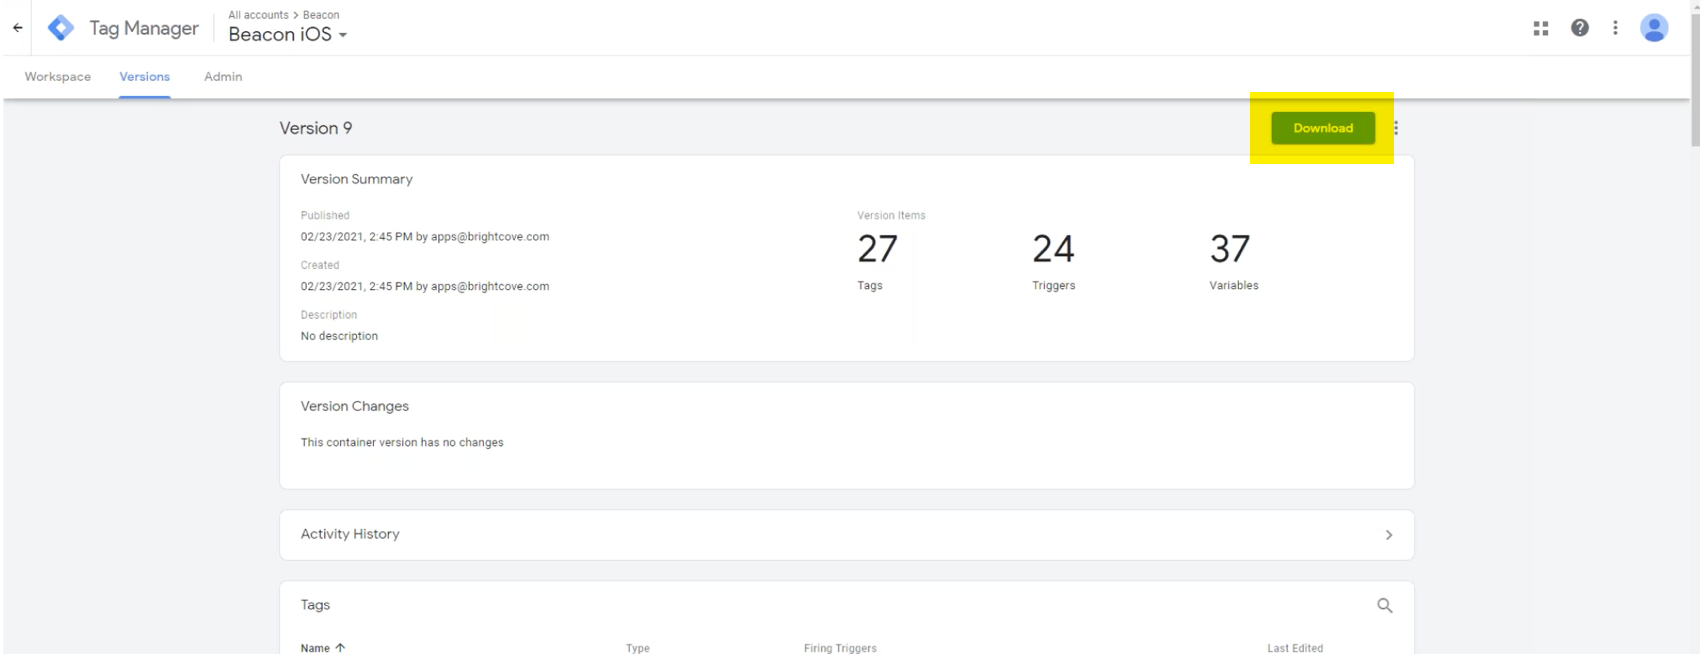
- For iOS and Android containers: Contact your onboarding manager and send these downloaded files to her/him, along with the screenshot of your containers and corresponding IDs. The files will be added to your corresponding apps.
- Be sure all containers are published.
Configure Firebase
- Browse to the Firebase Getting Started page.
- Click Create a project.
- Enter a project name.
- Accept the terms and click Continue.
- Accept the default of enabling Google Analytics for the project, and click Continue.
- Choose or supply a Google Analytics account.
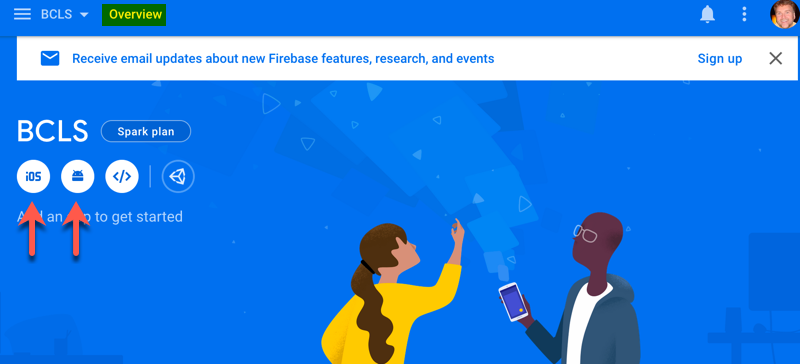
- Click Create project.
- Be sure you are returned to the Project Overview page. Also note the iOS and Android create app buttons (the red arrows indicate their positions).
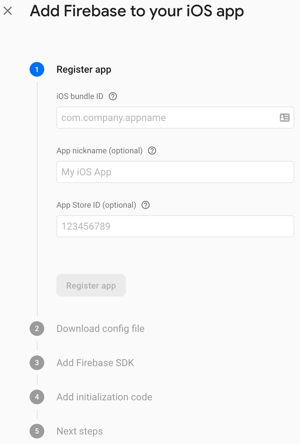
- If you are using an iOS app, click the iOS app button and complete the five steps to add Firebase to your iOS app. To complete the steps you will need an iOS developer to assist. The following Google document provides details on the steps:
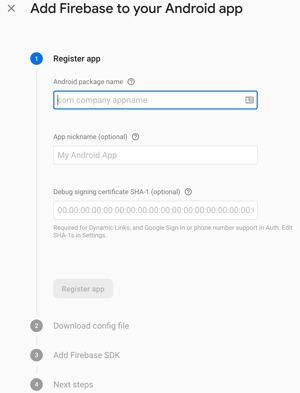
- If you are using an Android app, click the Android app button and complete the four steps to add Firebase to your Android app. To complete the steps you will need an Android developer to assist. The following Google document provides details on the steps:
After adding the Goggle Tag Manager and Firebase files, as detailed in the last two sections of this document, you should be able to check for events in Firebase itself. In addition, hits will have been sent to Google Analytics. Note that Google Tag Manager is acting as a middle man here, sending that information to Google Analytics based on data that is pushed to Firebase.
Install templates into Google Data Studio
Brightcove supplies Google Data Studio prebuilt report templates, one each for web, mobile and smart tv. In the Obtain templates and configuration files section earlier in this document you requested files/URLs from your onboarding manager. Three of the URLs are as follows:
- WEB: https://datastudio.google.com/reporting/43b8362b-785a-487d-b681-39dde640f029
- Mobile: https://datastudio.google.com/reporting/2ca9572d-e50e-4931-858a-e67dc99f62f9
- STV: https://datastudio.google.com/reporting/bfa8fad2-b4f6-4bfc-aee2-33742bf600a5
To use the templates, perform the following tasks:
- Note the use for the report, mobile, web or smart tv, then click on the URL.
- In a new browser tab, be sure you see the following:
- From the Select a view drop down, choose the matching property, mobile (iOS and Android), web or smart tv.
- Change the name of the configuration if you choose.
- Click Create.
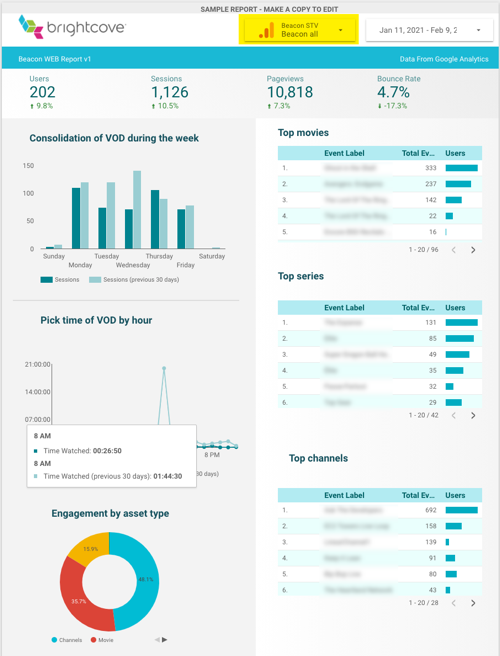
- The imported configuration will open. Examine the data to be sure it seems valid. An example is shown here:
That's it! Congratulations you have configured Google Analytics for Brightcove Beacon.